Testing Process
After you registered for a test and the test phase has started, you're ready to go! We recommend that you write the test report while you are testing, so you don't forget any of your steps.
This is how you get to the test report:
- Just click on the corresponding test on your Dashboard.
- Carefully read all the instructions in the test overview page again.
- Further down on the page, click on “Start Testing” and then on the next page on “Edit” to open the report.
You will usually see these fields in a test report:
Use Cases: Please record all steps taken during the whole test and write them in the use cases. The points from the test description should be reflected here. Tell us what you clicked on, one after another. Use bullet points and make a connection to the uploaded screenshots you're referring to.
Positive Feedback: What did you like during the test? Was there something especially user-friendly? Was the design or navigation appealing? Please ensure a specific reason is given to explain why a particular feature was user-friendly or appealing.
Negative Feedback: What did you dislike during the test? Was the navigation complicated? Some hard to read text? Please don't write about technical issues here! If the client wants such Bugs, we will offer a separate form for you to submit them.
Questions: Answer the questions (in written form or by giving a star rating). These are not part of every test. Written questions are “qualitative”, because the answers show qualities. Rating questions are “quantitative” because these quantify the feedback in numbers.
Screenshots / Screencasts: You should upload screenshots to document your testing procedure (cf. How many screenshots do I need to make?). In some cases, you will be asked to add screencasts (videos). You can only upload screenshots of common image file types. No Word files please!
Message to the Birdmaster: There is a box on the right-hand side where you can communicate with your Birdmaster. Have a question or concern about a specific test? Message us here and we’ll get back to you as fast as we can!
After you’ve finished the test report, don't forget to hit “Save” and then “Submit”. We recommend that you save your test report every now and then while you are filling it out, especially if you want to submit a Bug before you've finished your report.
When you come across a Bug during a test, you should report it. In Bug Tests we supply you with a special form for submitting Bugs and you will get paid extra for every new Bug you find! But even if this test doesn’t include Bugs, feel free to mention them in a message to your Birdmaster.
Bugs are submitted separately from test reports. Always save your current test report before you submit a new Bug!
This is how you submit a Bug:
- On the test overview page (where you see deadlines, payouts, etc.), find the “Add Bug” button in the footer.
- Click on it, and you’ll be taken to a page for describing the Bug in detail.
- Fill in all the required fields (see below).
- ALWAYS document the Bug by adding a screenshot! In some cases, screencasts are even better to show a problem.
- Save and submit.
These are the fields you usually need to fill out:
Title: Bugs should always be named using our standard format. Testers have to avoid submitting duplicates of Bugs that were already submitted. The main tool for this is the list of Bugs by other testers.. To avoid having to read every Bug in detail, it’s important to be able to understand, just from reading the title, what your Bug is about. To make it clear where the Bug is, you should first enter the name of the section where the Bug happened (e.g. "Shopping cart" or "Left navigation frame"), followed by a "-". In the second part of the title give a short description of the problem (e.g. "Order button doesn't work" or "Error message")
Example titles:
- Contact us form – Send button doesn’t work when clicked on
- About us page – Employee photos don’t load
Bug Category: These are terms supplied by us which you need to use to categorize Bugs. Choose the category that best describes your Bug.
Examples for the most common categories:
- Display error: a photo doesn’t load, a button is overlapping with a text
- Malfunction: a link doesn’t respond when clicked on, a button leads to the wrong action
- Spelling/grammar issue: a page with grammatical errors in the website/app
- Audio issue: a video plays but the sound is not working
- Other: any Bug that doesn’t fit into the other given categories
Occurrence: How frequently does the Bug appear? Once, sometimes or always? To find out, try to reproduce the Bug if it makes sense (this doesn't apply for spelling errors). Did you observe the Bug in 2 out of 5 times, then choose “Sometimes” and write the exact number in the text.
Severity: This scale goes from low (usually spelling mistakes) to medium (display problems) to high (non-functional content) and finally, critical (e.g. browser crash). Choose a severity degree that makes sense to you. If you need help, here is a guideline on attributing Bug severity. A Birdmaster will review your Bug and make revisions if necessary (possibly affecting your points and payments).
Description/Steps that led to the Bug: Here you should describe exactly which steps led to the Bug, click by click. If the description is not comprehensible, the Birdmaster might ask you to rewrite it. As in test reports, the steps should be numbered or listed with bullets.
Expected Result: What should have happened?
Actual Result: What actually happened?
Screenshots/screencast: For describing Bugs it is absolutely vital that you use screenshots (see How do I make screenshots?). If it's a severe error or it can't be shown with a screenshot, you should add a so-called screencast (cf. How do I make a screencast?). If an app crashes, you should add crashlogs (see How do I record crashlogs?). Ask yourself: Would I understand what happened in this Bug if I hadn’t seen it? If the answer is no, then you probably need to add a screencast!
Bugs that are not in this format will not be accepted. After you entered all this information, don't forget to save and submit the Bug!
Duplicates: It can happen that another Bird found the same Bug as you did, but a bit earlier. Unfortunately, we can't accept the same Bug twice, so you should look at the list of Bugs that were already submitted. To find the submitted Bugs list, go to the Test Overview page and find the section titled “Your Reports and Bugs”. There, you’ll find the “Bugs submitted by other testers” tab.
Keywords: multiple Bugs, similar Bugs, proof, documentation
It’s important to distinguish between saving and submitting. When you click Save, the current state of your report/Bug is saved. But only if you click Submit will the content be sent to the Birdmaster for review.
Before you submit your report/Bug, you should be able to answer the following questions with “Yes”:
- Did I use correct spelling and grammar? Am I sure that my report/Bug can be understood by someone else, like a Birdmaster or a client?
- Is my report/Bug form complete (i.e. all the fields are filled out, my steps are listed in numbers/bullets, etc.)?
- Did I upload the necessary files (i.e. screenshots, screencasts)?
Then, you can click Submit. Once you have submitted your report/Bug, it’s not possible to make changes.
Types of Test and Testing Documentation
You can find a quick run-through in this video (5:24), but make sure to fulfil all the guidelines outlined below.
Definition
Unmoderated Usability Tests are a type of test also sometimes referred to as “Thinking Out Loud” videos. These feature a screencapture accompanied by your comments on all the steps and thoughts you have while you are testing. It is usually not necessary to show your face on webcam. In contrast to screencasts documenting Bugs, the Unmoderated Usability Test is not about the presentation of single situations, instead it is a non-stop recording that portrays your complete testing procedure and all impressions you have.
The purpose of the video is to allow clients to see how their end users use and react to their website or app in a direct and unfiltered manner.
Here is an example of how a Unmoderated Usability Test video could look: https://s3.amazonaws.com/media.nngroup.com/media/editor/2014/08/18/thinking-aloud-demo.mp4
Preparation
- Choose a software to record the video.
- You can find a selection of appropriate software tools within the FAQ list.
- Images and sound must be perfectly clear – no matter which tool you choose to record with.
- The video has to be uploaded in a format that is supported by our platform: 3gpp, mp4, mov, webm, quicktime, x-flv, x-troff-msvideo, msvideo, x-msvideo, avi. If you want to use a different format you have to find a conversion program.
- Please pay attention to software limitations. For example, recordings with Screencast-o-matic are limited to 15 minutes, other software sometimes crashes if videos exceed 25 minutes. Depending on the test you may upload several 15 minute videos instead of one very long one.
- Does the microphone work? Does the recording of your screen work? Try it out with a short video about something else before doing the actual test.
- Create a proper working environment: For example, be careful that the audio recording is not disturbed by background noise (TV, traffic).
- Go through the tasks step by step. Please do not open the software you are testing until you have started the recording to make sure that your very first impression is being recorded.
- Prepare all the required material like task descriptions and useful questions before starting the recording.
*These are general guidelines. However, individual tests can be exceptions and instructions by the Birdmasters overrule these guidelines in specific cases.
Recording
- In order for us and the client to be able to use the video, it should comply with our quality standards. Non-compliance can result in your disqualification from the test.
- Please speak loudly, clearly and formulate every single problem, difficulty and uncertainty to help others understand your statements.
- Crowdtesting is not only about the negative aspects or difficult to complete tasks. Please also talk about everything that appears very comfortable and is simple to handle.
- If you reach a point where you do not know what to do or how to proceed, don’t worry! You should also mention this in your video.
- The video should show your clicks. In the FAQ entry regarding tools, you can find out how that works. If you are not able to visualize your clicks, you must describe exactly what you are clicking, tapping or doing otherwise in the test.
- Throughout the entire testing process, keep an eye on whether the recording still works. Try to check it every few minutes, so none of your work is lost.
- Perform the required tasks and answer the given questions.
- Did you only have the task of describing your impressions of the app or website? Are you struggling with answering the questions? Here are a few additional questions you can answer in your video:
- What are your expectations before clicking on a given element?
- Have your expectations been fulfilled?
- Which tasks can be carried out easily and what is complicated to do?
- What are the aspects you like or do not like?
- Where do you encounter problems?
- Did you understand everything correctly?
- Is some information open to multiple interpretations?
- What features are you missing?
- What confuses you?
- Is there an obstacle you can’t overcome?
- What kinds of feelings does the app/website trigger?
Wrapping Up
- Save the video to your device and keep it for a few days after the test has finished to have a backup if needed.
- Please be aware of the maximum file size you can upload for each test.
- You should try to create a second version of your video if the file size of the original one is too big. Please do not delete the original recording!
- A useful software to compress videos is Microsoft Clipchamp. Simply drag in the video and then click on the “Export” button and select the desired video quality (e.g. 720p), so the video is compressed but retains its quality.
- Please upload the video to the given section and check if your test is complete. After that, hand it in.
Definition
As the name suggests, Remote Interviews are a type of test, where you will be interviewed by someone who is not in the same room. So, instead of having to write a report or documenting your testing in screenshots and screencasts, you will have a conversation through Skype or similar Voice-over-IP (VoIP) applications. As facial expressions often help understanding each other, these interviews can sometimes also take the form of video calls. Sometimes, interviews will be recorded by the interviewer for later reference, so that they can focus on talking to you without having to worry about writing down everything at the same time.
The interviews will either be moderated by a Birdmaster from Testbirds or by the client. In both cases, a Birdmaster from Testbirds will usually join the call and help in case of questions or issues.
The advantage of this kind of testing is that it allows a more natural conversation: Both you and the interviewer can immediately address anything that’s unclear. It’s an informal conversation where there are no wrong answers. At the same time you don’t have to go anywhere to meet up with them, but can still test from the comfort of your home. Testbirds wants to protect your privacy as much as possible during the interview, so we’ll only share your personal information with the client if absolutely necessary and after getting your permission. Please also take care not to mention any unwanted personal details during your video, as it may not be possible to edit them out.
So, as you see, while Remote Interviews might seem unusual at first, they are actually easier and faster than most other tests because you don’t have to write a report. At the same time, the average hourly payout is usually a lot higher.
Preparation
- To participate in Remote Interviews you will usually need the following technical setup on your computer:
- microphone, ideally a headset. It’s absolutely necessary that we can hear each other perfectly.
- webcam (if one is necessary, this will be specified in the instructions)
- stable Internet connection and a decent bandwidth (we recommend 1Mbit/s for upload and 10Mbit/s for download), as the combination of audio, video and your shared screen can create quite a load
- the free software through which the interview is done, e.g. Skype. We’ll let you know beforehand which one it is and where to get it
- If you are using the Voice-over-IP application for the first time, let us know, so we can provide additional help or even do a quick test run with you, if necessary
- Avoid any disruptions and create a proper working environment: For example, be careful that the audio recording is not disturbed by background noise (TV, traffic).
- If the interview requires you to share your screen, please make sure to close any unnecessary or distracting programmes in the background
- We’ll make sure to share all relevant information with you beforehand, so you are well prepared
- Be ready at least 5 minutes before the interview. You can usually already dial in, “meet” the Birdmaster and make sure the technical setup is working.
Recording of the interview
It may be necessary to record the interview (your sound, webcam and screen) for later evaluation, because it’s usually too much to write down during the interview. There are sometimes several interviews happening in a single day, so interviewers can use recordings to refresh their memory or compare answers. We respect your privacy: Without your permission, recordings will not be used for any purposes other than those mentioned above.
Testbirds or the client will take care of recording, so you don’t have to bother and can focus on the conversation.
During the Interview
- Please speak loudly, clearly and make sure to help others understand your statements.
- Often there is a slight delay in audio so please take your time whilst speaking by taking a moment between making points. This will allow the interviewer to dig deeper into your answer, if desired.
- There are no wrong replies, just answer all questions truthfully/according to your opinion.
- Don’t be afraid to give constructive criticism of the software that’s being tested. Clients are grateful for all your suggestions, if it helps them improve their product.
*These are general guidelines. However, individual tests can be exceptions and instructions by the Birdmasters overrule these guidelines in specific cases.
The number of screenshots you should submit depends on whether a (regular) test report or a Bug is concerned. For guidelines about Bug Approvals, see the separate entry. You will usually not be able to submit anything if you have not added enough screenshots.
Test report: For the test report, so-called "alibi-screenshots" are required. We need to see that you covered all relevant parts of the test. In these screenshots you can for example show the positive/negative aspects you mentioned in your report. In the test description, we will often tell you the minimum amount of screenshots required for that test.
Bug: Screenshots are vitally important in order for us to understand which steps led to the Bug and reproduce it. When in doubt, it's better to make more screenshots than too few. In case of malfunctions, a screencast can usually show the problem better.
Important:
- Always try to create a connection in the text to the screenshot you are referring to!
- Only upload screenshots in the formats png, gif, jpg or jpeg!
- Please make sure that the screenshot shows the complete window. This also includes the URL of the test website.
Screencasts record all screen activities in a video. Screencasts can be useful to document certain kinds of Bugs. Especially when it comes to malfunctions (like buttons that don't work) doing a screencast very important. In some tests, screencasts are even mandatory (we’ll mention this in the test description). Remember that our Nest supports the following video formats: 3gpp, mp4, mov, webm, quicktime, x-flv, x-troff-msvideo, msvideo, x-msvideo, avi. The format .swf is not allowed. The maximum video file upload size is 500 MB.
Some free screencast programs for PCs:
For Windows and Mac
Screenpal: recordings are limited to 15 minutes with the free version.
Screencastify (Chrome Plugin): limited to 50 videos per month, each with a maximum length of 10 minutes.
Jing: Jing only saves screencasts to .swf format, which isn’t supported by our platform. However, you can use a Free SWF to AVI Converter to convert it to a format we support. You'd also have to sign up for Jing. We recommend only using it, if no other tool works for you.
For Windows only
To record your screen on Windows, you can use the Xbox Game Bar. First open the window you would like to record. Then press the [Windows] + [G] keys simultaneously to start the screen recording tool. Alternatively, you can also find the tool via the search function of the taskbar. You can enter the search term "Xbox Game Bar" and open the application.
For Mac only
The latest versions of MacOS have an in-built screen recording tool! By default press Shift-Command-5 to open. You can record multiple screens, one screen, or only a selection or choose a mic to use.
Alternatively try QuickTime Player.
You can find help on both of these here.
Linux
Depending on your distribution Kazam might work. But there are many other good applications out there.
Screencast programs for smartphones, iPads and other tablets (RECOMMENDED!):
Some devices have integrated functionalities to record a video of your screen and there are many programs available.
If you are using iOS or Android then we recommend using the Testbirds Companion app for an ad-free, data-safe tool.


- Once you have installed the app, open it, and tap “record” from the menu at the bottom:

- Follow the in-app steps to configure your permissions and settings.
- To record, tap the “record” button from the menu at the bottom of your screen
- Then tap “Start recording now” in the middle of the page to begin.
You will receive a countdown before recording starts.
You can pause or stop the recording at any time. Remember to name and save your video once you’re done. You can also take screenshots using the app.
If you don't want to use the Tesbirds app or you need to record your tablet screen:
Try searching online for "screencast" + your device model.
Otherwise, you can use one of the programs here. None of them require you to root/jailbreak your phone. Some of these may require a PC to which you'll mirror your mobile display and then use one of the PC screen recorders mentioned above.
Android
AZ Screen Recorder (Android version 5.0 and above).
Vysor (4.1 and above; mirrors device to your computer and records sound using PC microphone)
Mobizen (for versions 4.2 and above)
iOS
Caution: This method does not record sound reliably. Starting with iOS 11, your device has an intergrated recording function. You just need to add the feature's button to the Quick Menu/Control Center. To do so, go to Settings > Control Center > Customize Controls. Next, tap the green + button next to Screen Recording. Now, a recording button as part of your general quick control center options.
For other iOS versions:
use QuickTime Player on your computer and connect with the mobile device (see. "Record a movie")
AirServer (free trial version)
Windows Phone
Only if your device doesn't support screencast software at all, should you use an external camera to record a video of the screen.
Testing Best Practice
Here are two examples of good bug reports from our Entry Tests. The layout is different in the actual Bug form, but the fields should be named similarly. If you want to know how to report a bug, please look at this FAQ entry: How do I report a Bug?
Example 1
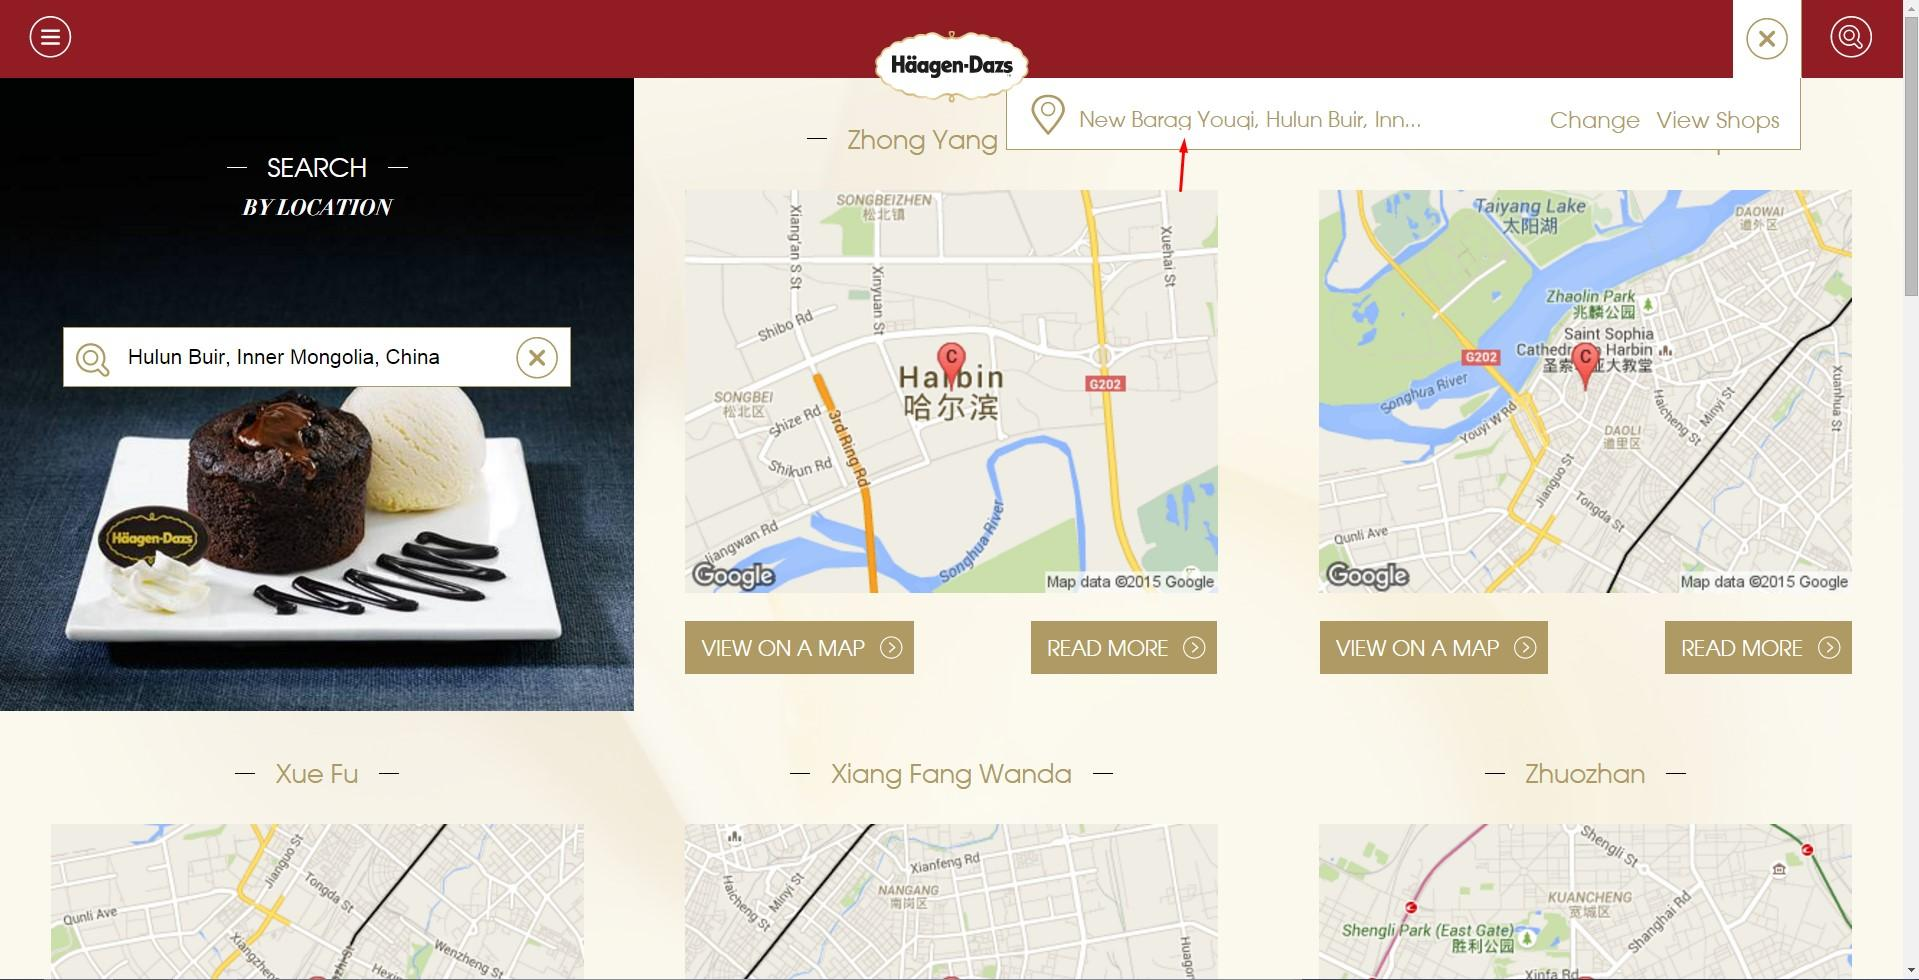
Bug Title: Find Location - Lower case "g" is cut-off in the shop locator search bar
Bug Category: Display Error
Severity: Low
Occurrence: Always
Steps that led to the Bug:
- Clicked on the shop locator icon in the top right corner
- Searched for the following post-code: 021316
- Pressed Enter
Expected Result:
The result shows New Barag Youki, Hulun Buir... without any UI issues
Actual Result:
The location names that contain a lower case "g" are cut-off. The same applies for "q".
Screenshot:
Example 2
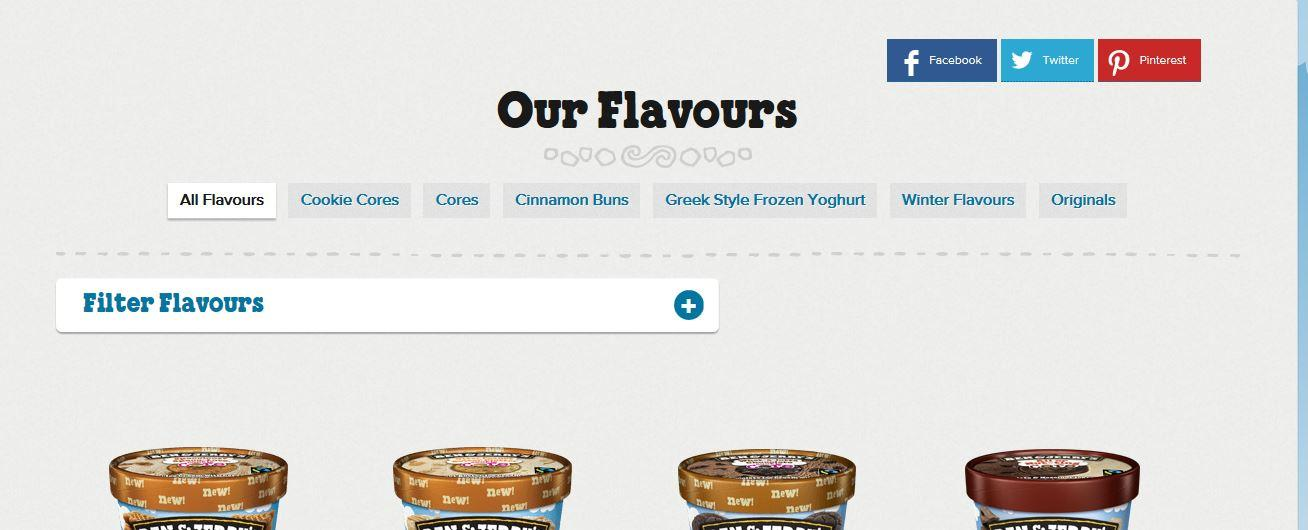
Bug Title: Flavours Page - Cinnamon Buns tab not showing the results
Bug Category: Malfunction
Severity: Medium
Occurrence: Always
Steps that led to the Bug:
- Go to Flavours Tab
- Click on "Our Flavours" from the dropdown list
- Click on the "Cinnamon Buns" tab under the page title
Expected Result:
Information about Cinnamon Buns Ice Cream displayed.
Actual Result:
Getting redirected to the main landing page.
| Screenshot | Screencast (Press to play) |
 |
 |