General
To become a tester and participate in paid client tests, all you have to do is:
- Register as a tester on our platform
- Fill out your basic and advanced profile.
- Set up at least one device to test with.
- Complete our Entry Test. This is an introductory test, which will help you familiarise yourself with our platform and testing standards. Once our Birdmasters have “approved” your report, you will be ready to take part in paid tests for real clients and products.
To find out what it's like being a Tester check out our blog where we regularly feature guest posts by some of testers. If you're interested in testing and technology, and would like to make some extra money with a fun activity, then Testbirds is the place for you.
It's great that you want to help the Community grow! You can use your personal Tester Referral link and share it with your friends, wherever you'd like (e.g. Facebook, Twitter, your blog, etc.). The "Refer Friends" option is available in the left side menu in the "Community" section. We'll award you with Community Points for referring new friends to Testbirds. The Top 10 Bird Recruiters will be featured on your dashboard. If you want further details and explanations regarding your earned Community Points, you can simply click on the heart symbol next to your notifications.
We understand it can feel a little scary to share certain personal information. After all, we are users of many platforms ourselves and as such know how weird it can feel to have your information online. No need to worry though: We strictly follow the rule to only ask for information that is necessary for collaboration.
We also initiated a set of guidelines (supported by the German Crowdsourcing Association) aimed at creating a trusting and fair cooperation between service providers, clients and crowdworkers because we really care about our testers.
In this code of conduct we commit to protecting your data. What's more, we're based in Germany which has some of the strictest data protection laws in the world.
If you'd like to learn more about the code of conduct please visit http://www.crowdsourcing-code.com/
App
Short for Application. Program for users; at Testbirds as well as in common language this refers to little programs and additional functions for smartphones and tablet/slate computers.
Browser
Software program, that can read, download, save and display documents on the World Wide Web. Common browsers are Internet Explorer, Firefox, Chrome, Opera or Safari.
BOTM
Bird of the Month. Every month we present Birds (testers) with special accomplishments in a “Hall of Fame” on the main page of our platform.
Bug
Technical error, fault in the programming.
Bug Approval
Bugs that one tester found are verified on the devices/systems of other testers. This way we can see if Bugs appear in general or only on specific system constellations
Cloud
Saving and keeping files online on servers instead of your computer at home or an external device, making data available to you 24/7 from anywhere in the world.
Community
Users of platforms, portals, discussion boards and social networks, that meet online. At Testbirds the community is made up of the testers (Birds) that register on the platform (Nest).
Crowdsourcing
Working on tasks by using the knowledge and experience of the global online community (collective/swarm intelligence).
Crowdtesting
Testing software (e.g. apps and web services) by using the knowledge and experience of the global online community (collective/swarm intelligence).
Dashboard
Testbirds main page, where you have an overview of the most important information.
Explorative Testing
Testing with the help of specific use cases and free exploration.
UI
User Interface: The part of software that is visible to the common user.
Usability
User-friendliness, usefulness for fulfilling the wants of a user.
UX
User Experience: The sum of all impressions/opinions a person has when using a product/service.
Don't have a testing account yet?
You can contact our tester support team via e-mail: birdmaster@testbirds.com.
Have a testing account?
My question is about a test:
- Use the “Message to Birdmaster” field on the right side of the test view.
My question is not about a test:
- Already logged in? Contact us.
- If not, please log in and use the contact form in the “Help” section on the left.
If, for some reason, you would like to contact one of our experienced testers, feel free to reach out to Marcus via helperbirds@gmail.com. Please keep in mind that Helperbirds are individuals who volunteered for this task. They do not have access to internal information like the content of testing projects.
In case you want to file a complaint about Testbirds and none of the above contact persons were able to help you - and only then! -, you can reach out to this independent ombudsman office: https://ombudsstelle.crowdwork-igmetall.de/en/
My Account
No! Please make sure to sign up with a permanent e-mail address through which we can inform you of new invitations, as registrations made with a "throwaway" e-mail address will be deleted. This is because we want to ensure the authenticity of the users on our platform. If you have already used a throwaway address, please change the submitted e-mail address on your profile.
In your settings you are also able to select what kind of mails you would like to receive from us, so you won't receive more than you wish to.
Your information will be save with us, as our servers are located in Germany where we must follow strict terms of data protection (GDPR). So, you can be sure that your personal information is stored in a secure place and will never be given to third parties. We only use it to match the right tester with the right job!
No. Due to the non-disclosure section in our Terms & Conditions you are prohibited from sharing information about tests.
As invitations are sent to you according to your devices and profile, there is no point in sharing your account, because we only want the real person on the profile to test. People you know must create their own tester accounts (here is how you can earn Community Points by recruiting them). Maybe you’ll still get invited to the same test.
If both you and your friend are invited for a test, please also do not perform the test together. We need your individual opinions in completely separate test reports. By testing collaboratively, you might influence each other, so only one report can be accepted.
No. All the information about you should be in one account, so that we can invite you for the maximum of suitable tests. By creating more than one account, you could be invited to the same test twice. This is considered cheating and will result in the deletion of your accounts. We also reserve the right to take legal action against the creators of multiple accounts.
Keywords: Double Account
Your profile is your ticket to new test invitations.
For example, we could be looking for people with specific hobbies or a particular work background or device for one of our tests. This means that you can only be invited to a paid test after you have filled out key information fields in your “Basic” profile. And naturally, the more information you provide in your “Advanced” profile as well, the greater your chances of receiving an invitation!
Please also note if you don't fill out your correct name and location, we cannot transfer your payments to you. this information is needed for the credit notice, which you receive when a payout is requested.
Have a go at editing your profile by clicking your username in the top right hand corner. A progress bar will track how far you are from completing your “Basic” and “Advanced” information which will be displayed on your profile page. Don't forget to click “Save”, so your changes are not lost!
Keywords: Privacy, Data Security
In the Special Knowledge section, if you haven’t selected any testing tools in which you are proficient, please select the option ‘none’ from the list. Then also type and select "none" in the box which will appear on the right. If this doesn’t work, please let us know!

Most of the notifications that you see in the top right corner of the Nest are also delivered as e-mails.
It’s possible that your email provider has marked our emails as spam. Please check your Spam and Trash folders for our emails. If you find them there, mark them as “Not spam”. We also recommend adding noreply@testbirds.de and any other Testbirds e-mail addresses to your “Safe Sender” list, or creating a filter which keeps emails from us in your inbox. If you didn’t find the emails in these folders, please let us know through the contact form so we can assist you.
Gmail users - Add our emails to your Primary inbox. To do this, go to a message from Testbirds.
- Desktop: drag this email into the primary tab in your main inbox
- Mobile/Cell: Click the three dots in the top right of the email, click "Move To" and then "Primary".
Outlook users - If you have an email from Testbirds with a picture, you can click the banner that says "Click here to download pictures" at the top of the email. You can then choose "Add Sender to Safe Senders list". OR, if you don't have an email like that, follow the steps here.
Apple mail users - Find an email from Testbirds. Click on our email address in at the top of that message (next to the "From" field) and choose "Add to Contacts" or "Add to VIPs".
Using a different email platform? This page has simple instructions (with screenshots) for several other popular email clients.
As a Bird you receive points for different actions that reflect your experience as a tester. When you are newly "hatched", you get one-time points for your first steps. By registering your first device, successfully completing tests, finding bugs or taking Bird School quizzes you can increase your points. The amount of experience points you get depends on the quality of what you submit. If the Birdmasters need you to revise your reports and Bugs, they have to give you fewer EPs. So being thorough pays off, if you want to be among the Top Birds!
One-time Experience Points:
|
Action |
EPs |
|
Registering your first device |
5 |
|
Completing your Basic Profile |
10 |
|
Successfully completing the entry test |
15 |
|
Becoming one of our "Birds of the Month" |
50 |
Recurring Experience Points:
|
Test Reports |
|
|
Reason |
EPs |
|
Accepted without any revisions |
40 |
|
One revision |
20 |
|
Multiple revisions |
10 |
|
More than 3 revisions or not submitted in time |
0 |
|
Bugs |
|
|
Reason |
EPs |
|
Accepted without any revisions |
10 |
|
One revision |
5 |
|
Several revisions or not submitted in time |
0 |
There are no points for Bugs in the Entry Test
|
Bird School Quizzes |
|
|
Score |
EPs |
|
Passed on 1st attempt |
30 |
|
Passed on 2nd attempt |
25 |
|
Passed on 3rd attempt |
20 |
|
Passed after 4 or more attempts |
15 |
Points for Bird School Quizzes may vary depending on the difficulty.
Birdmasters are free to award Experience Points in additional cases, when applicable. This could include pre-test questionnaires and surveys.
Community Points are a way to reward our testers for a variety of non-testing related tasks. This includes, but is not limited to:
- Recruiting testers, Writing a guest blog post,Participating in a test after being queued as a back-up tester, or simply by being a great tester and making our day.
In general, testers can earn CPs by contributing positively to the Testbirds community. Unlike Experience Points, these points are not competitive and won’t be displayed to other testers on the Dashboard. The only aspect of CPs that is somewhat competitive is “tester recruiting”. You can see the top recruiters on your Dashboard in the table titled “Top 10 Bird Recruiters and You”. You can recruit your friends and earn CPs with your own tracking link and sharing it.
Community Points: Achievements and Values
|
Action |
CPs |
|---|---|
| Uploading your first profile picture* | 5 |
|
Recruiting new testers |
|
|
Regular Recruiting |
10 |
|
Special Recruiting |
40-80 |
|
Made-my-Day |
5-20 |
|
Guest Blog Post |
40 |
|
Participating after the Queue |
10 |
|
Bird of the Month (Special Accomplishment) |
50 |
|
Other Achievements |
5-100 |
Birdmasters are free to award Community Points in additional cases, when applicable.
Regular Recruiting can be done by any one of our testers, and it simply involves referring someone to our Nest by using your personal referral link.
Special Recruiting is when we ask testers to recruit people with specific criteria. For example, if we need testers in the Maldives who go scuba diving regularly, we would ask our testers to help recruit this unique group of people for us and in turn earn community points!
*If you haven't been awarded the points, please upload your profile picture again.
We are sorry to hear that you’re considering deleting your account! What’s wrong? Please contact our Crowd Team first, so we can find a solution together.
Please be aware that deletions cannot be undone, all your personal information will be deleted, and your work will be assigned to the user “Anonymous”. Therefore, if you have a balance of 6 Euros or more, make sure to request a payout before deleting your account.
In case you just want to take a break, you can activate the “Silent Mode” in your settings. Then, you will not get invited anymore until you deactivate it again.
Maybe you’ll be invited to the most exciting test next week. Do you really want to miss out?
If you still want to delete your account:
- First make sure you are logged in to https://nest.testbirds.com
- Click on the top right corner, where your username is
- Then go to “Settings”. (This is also where you can activate the Silent Mode)
- You’ll find the “Delete Account” option at the very bottom right side
- On the next page confirm the deletion
Devices
Depending on the test and our client’s demands, different devices (device models, operating systems, browsers, …) will be needed for testing. So it's important that you specify all devices (e.g. PC and browser, Smartphone, Tablet, etc.) you are able to test with. We can only invite you to a paid test after you have registered at least one device.
You can add your testing devices on this page: https://nest.testbirds.com/device/index.html This "Devices" section is also available in the left-side menu, when you are logged in on our platform.
Here's an example how you would add your smartphone:
- On the "Devices" page, click "Add Smartphone".
- In the alphabetical list of manufacturers, find "Samsung", then your model, for example "S7 edge".
- Under "OS Version" choose your operating system version, e.g. "Android 6.0.1".
- Make sure you also choose at least one browser from the list. If you are using more than one browser, click "Add Browser"
- All the other fields (Antivirus, Network Provider,...) are not required. If you are unsure, you can skip them for now, but if you add them, you'll have better chances for future tests.
PCs, tablets and other device types can be added similarly through the above mentioned "Devices" page.
To update a device:
- On the above mentioned "Devices" page, click "Update" next to the listing of your device.
- Change the information where applicable.
There is a very useful website, which will give you a lot of information about your device at a quick glance: https://www.whatismybrowser.com/
What's my device model?
- Do you still have the box that the device came in or the manual? All the details should be in there.
- The model name is sometimes displayed when you switch on the device.
- Look for menu options such as “Settings”, “Options”, “About device”, “Preferences”
- If you find a product code (that is not the model name), try searching online for it
- GSM Arena (http://www.gsmarena.com) has a huge database and options like “Phone finder” and “Tablet finder” to help you find your model.
Keywords: Computer, Laptop, Smartphone
What's my operating system?
Desktop devices
Microsoft Windows: Try key combinations such as:
- Windows Button
and Pause Button OR
- Windows Button
Apple Mac OS: First click on the black Apple symbol and then “About This Mac” (pane).
Mobile devices
Android
Depending on your individual device and Android version, this can vary a lot. Here’s an example on how to find it on a Samsung Galaxy S 4:
- Open “Settings”
- Tap on "Options" tab
- Scroll down to device information
- Look for the information under “Android Version”
Most likely, the steps are similar on your phone/tablet. In any case, look for areas such as: Settings, Options, About Phone, Software Info…
iOS
Different versions may vary a bit. Here is how it works on iOS 8.2:
- Open “Settings”
- Press “General”
- Press “About”
- Look for the information under “Version”
Keywords: Computer, Laptop, Smartphone
Open https://www.whatismybrowser.com. It will tell you what browser you are currently using.
Keywords: Computer, Laptop, Smartphone
There are many websites available which offer "virtual machines" which simulate other devices. You must not use these to test with Testbirds. Only add devices which you physically have access to test with to your device list. They must be real devices.
Always test with the device selected when you accept an invitation.
Tests conducted using virtual machines will not be accepted.
Testing Process
The Entry Test is the starting point for all new members of our community. It is a practice test where you can familiarize yourself with the platform and run-through tasks that you’d do in a real test.
You can only receive invitations to real tests after you have successfully completed the Entry Test. The aim is for you to get to know the typical testing process under real circumstances and be able to ask questions before taking part in paid tests. It will only appear in your “Open Tasks” section after you have registered at least one device and it can only be completed once.
Since the Entry Test is just a tutorial, you will not receive a regular payment for its completion, but if you pass, you will get a one-time Experience Point bonus of 15 EPs for passing. You are of course welcome to use it to practise submitting Bugs too, just kindly note there is no additional payment or bonus points for finding Bugs in the Entry Test.
To be eligible to take part in paid tests, please ensure that you:
- Fill in your basic and advanced profile as thoroughly as possible
- Register your devices in the Nest
- Successfully complete an Entry Test
No! Using AI (like ChatGPT for instance) to generate feedback on any test project is strictly prohibited. We want to provide the highest quality of Crowd testing possible. For this we need original and authentic reports. We do not offer AI generated feedback to our clients.
We use our database to identify and invite a representative group of testers who fit the specific profile requirements of each test. For example, if a company needs to test how 16-25-year-old males, living in Stockholm, use their fitness app on an Android device, our system will automatically find and invite only the testers who match these specific criteria; in this example, testers aged 16-25, male, living in Stockholm, who own an Android device and are interested in fitness.
If your profile fits the criteria for a test, you’ll be invited by us via e-mail. We will send you a detailed outline of what the test will involve and the timeframe for completing the test, in the “test overview” section of an invitation. Please read through this information carefully to decide if you want and are able to participate in the test, before you sign up.
There is no reason to be alarmed if it takes some time before you receive your next invitation. How often you are invited to test really varies as it depends entirely on specific client requirements. Most of the time, testers are invited according to what devices they have registered on our platform and a set of demographics defined by each client individually (i.e. location, job position, language skills, hobbies etc.). Only testers who fit the profile for a specific test can be invited.
As such, there may be times when you get invited to test often, and by the same token, other times when you don't receive an invitation for weeks or months. To give yourself the best chances of receiving an invitation, we strongly recommend that you ensure both your “Basic” and “Advanced” profile information is completely filled out and up-to-date. Since we will often have to filter for very specific profile details – the more information you provide, the greater the chance we will match your profile to the specifications of a test. For the same reason, we also recommend that you list all your devices in our platform.
If you don't receive an invitation for a long time, don't get discouraged. Please don’t send us e-mails asking for new invitations; selecting testers is completely out of our hands! Our system will automatically send emails to testers who most closely fit the profile requirements of our clients. Keep in mind that new projects often come up unexpectedly and we might soon need your profile for an upcoming test.
Attention!
If you aren't invited for several weeks, this doesn't mean your work wasn't good. If something is wrong or needs to be improved, our Birdmasters will tell you openly. After all, software testing is a learning process.
Testing is divided into 3 different phases: Sign Up, Testing, and the Review phase. Please ensure you complete all phases of the test.
- Sign Up phase: During this phase you can respond to your test invitation, and sign up to a test, provided there is still space available (first come, first serve) and you sign up in time.”.
(Kindly note, that if all spaces for testers have already been filled or if you miss the sign-up deadline for a test, you will not be able to proceed to participating in the test.) - Testing phase: Here you will get access to login data and all the other necessary information so that you can start testing right away. You have until the end of the testing phase to submit your report and/or Bugs. Usually, the testing phase lasts one or two days.
- Review phase: Your report will be reviewed by a Birdmaster and pends their “approval”. It may happen that your report or Bug was missing some information or wasn’t thorough enough. In that case, your Birdmaster will ask you to revise it. Please do so in this phase. Kindly note, that this phase is to “review” your work only - you will no longer be able to test. So please ensure, you save your notes while testing, for reference when reviewing your work.
You will always be notified about test invitations via e-mail. These include a link to the test overview (see step 2 below).
These are the steps to follow in the Nest when you receive an invitation:
- On the main page, in the section Open Tasks you'll see an overview of recent tests you’ve been invited to*
- By clicking on the green test name, you'll see the test overview with detailed information (e.g. requirements, payout, deadlines, etc.). You have to read all the tabs of the overview before you can join the test.
- Below the description you'll see the slot(s) available to you. Click on the button next to the device name to sign up for the test. Accepting an invitation makes it binding for you to participate.
- If all the regular places on the test have already been taken, you might get a place as a back-up tester.
If you sign up and then unexpectedly cannot participate, you must inform the Birdmaster immediately. The best way to do this is to message your Birdmaster using the “Message to the Birdmaster” comment box on the right side of the test. If this isn’t available, you can inform us via E-Mail at: birdmaster@testbirds.de. Birds who repeatedly miss tests that they signed up for will be excluded temporarily from invitations or, in very serious cases, be banned from the Nest.
*To take part in paid tests you first need to have set up a device and completed the entry test (see What is the Entry Test?).
After you registered for a test and the test phase has started, you're ready to go! We recommend that you write the test report while you are testing, so you don't forget any of your steps.
This is how you get to the test report:
- Just click on the corresponding test on your Dashboard.
- Carefully read all the instructions in the test overview page again.
- Further down on the page, click on “Start Testing” and then on the next page on “Edit” to open the report.
You will usually see these fields in a test report:
Use Cases: Please record all steps taken during the whole test and write them in the use cases. The points from the test description should be reflected here. Tell us what you clicked on, one after another. Use bullet points and make a connection to the uploaded screenshots you're referring to.
Positive Feedback: What did you like during the test? Was there something especially user-friendly? Was the design or navigation appealing? Please ensure a specific reason is given to explain why a particular feature was user-friendly or appealing.
Negative Feedback: What did you dislike during the test? Was the navigation complicated? Some hard to read text? Please don't write about technical issues here! If the client wants such Bugs, we will offer a separate form for you to submit them.
Questions: Answer the questions (in written form or by giving a star rating). These are not part of every test. Written questions are “qualitative”, because the answers show qualities. Rating questions are “quantitative” because these quantify the feedback in numbers.
Screenshots / Screencasts: You should upload screenshots to document your testing procedure (cf. How many screenshots do I need to make?). In some cases, you will be asked to add screencasts (videos). You can only upload screenshots of common image file types. No Word files please!
Message to the Birdmaster: There is a box on the right-hand side where you can communicate with your Birdmaster. Have a question or concern about a specific test? Message us here and we’ll get back to you as fast as we can!
After you’ve finished the test report, don't forget to hit “Save” and then “Submit”. We recommend that you save your test report every now and then while you are filling it out, especially if you want to submit a Bug before you've finished your report.
Most of our tests have specific device requirements so you may no longer meet the testing criteria. Please get in touch and let us know that you updated your device; we can check with the Birdmaster responsible for the test to see if you still qualify.
We try to send out most invitations at a time that will be convenient for most testers. However, to avoid unnecessary rejections of testers, our system automatically only invites a few people at intervals until all available spaces have been filled by testers. That means we can’t always influence when invitations are sent.
It works like this for example:
We need 30 testers, so the system invites 50. Out of those, 15 accept the invitation within the first two hours, and 15 are still missing. Then after a while, the system invites another 30 people, which leads to another 10 people signing up. However, 5 are still missing, so another group of invitations is sent. This continues until we have enough testers or the sign up phase has ended. We think this system is better than inviting all testers that fit the criteria right in the beginning, because that would mean disappointing a lot more people.
So if you get invitations shortly before the test is full, this likely means that there was only one spot left and someone else took it before you.
Keywords: time of day, time zone, sign up ends, late, night, morning
If you're invited to a test, you should only sign up if you are absolutely certain that you'll be available in the agreed time span. In case something really urgent comes up, you must inform the Birdmaster immediately. The best way to do this is to message your Birdmaster using the “Message to the Birdmaster” comment box. If this option isn’t available. Go to “Help” -> “Contact” and select the relevant test from the dropdown in the form.
If Birds repeatedly register for tests and then don't take part after all, we're forced to (temporarily) exclude unreliable Birds from future tests or in the worst case, delete these accounts.
When you come across a Bug during a test, you should report it. In Bug Tests we supply you with a special form for submitting Bugs and you will get paid extra for every new Bug you find! But even if this test doesn’t include Bugs, feel free to mention them in a message to your Birdmaster.
Bugs are submitted separately from test reports. Always save your current test report before you submit a new Bug!
This is how you submit a Bug:
- On the test overview page (where you see deadlines, payouts, etc.), find the “Add Bug” button in the footer.
- Click on it, and you’ll be taken to a page for describing the Bug in detail.
- Fill in all the required fields (see below).
- ALWAYS document the Bug by adding a screenshot! In some cases, screencasts are even better to show a problem.
- Save and submit.
These are the fields you usually need to fill out:
Title: Bugs should always be named using our standard format. Testers have to avoid submitting duplicates of Bugs that were already submitted. The main tool for this is the list of Bugs by other testers.. To avoid having to read every Bug in detail, it’s important to be able to understand, just from reading the title, what your Bug is about. To make it clear where the Bug is, you should first enter the name of the section where the Bug happened (e.g. "Shopping cart" or "Left navigation frame"), followed by a "-". In the second part of the title give a short description of the problem (e.g. "Order button doesn't work" or "Error message")
Example titles:
- Contact us form – Send button doesn’t work when clicked on
- About us page – Employee photos don’t load
Bug Category: These are terms supplied by us which you need to use to categorize Bugs. Choose the category that best describes your Bug.
Examples for the most common categories:
- Display error: a photo doesn’t load, a button is overlapping with a text
- Malfunction: a link doesn’t respond when clicked on, a button leads to the wrong action
- Spelling/grammar issue: a page with grammatical errors in the website/app
- Audio issue: a video plays but the sound is not working
- Other: any Bug that doesn’t fit into the other given categories
Occurrence: How frequently does the Bug appear? Once, sometimes or always? To find out, try to reproduce the Bug if it makes sense (this doesn't apply for spelling errors). Did you observe the Bug in 2 out of 5 times, then choose “Sometimes” and write the exact number in the text.
Severity: This scale goes from low (usually spelling mistakes) to medium (display problems) to high (non-functional content) and finally, critical (e.g. browser crash). Choose a severity degree that makes sense to you. If you need help, here is a guideline on attributing Bug severity. A Birdmaster will review your Bug and make revisions if necessary (possibly affecting your points and payments).
Description/Steps that led to the Bug: Here you should describe exactly which steps led to the Bug, click by click. If the description is not comprehensible, the Birdmaster might ask you to rewrite it. As in test reports, the steps should be numbered or listed with bullets.
Expected Result: What should have happened?
Actual Result: What actually happened?
Screenshots/screencast: For describing Bugs it is absolutely vital that you use screenshots (see How do I make screenshots?). If it's a severe error or it can't be shown with a screenshot, you should add a so-called screencast (cf. How do I make a screencast?). If an app crashes, you should add crashlogs (see How do I record crashlogs?). Ask yourself: Would I understand what happened in this Bug if I hadn’t seen it? If the answer is no, then you probably need to add a screencast!
Bugs that are not in this format will not be accepted. After you entered all this information, don't forget to save and submit the Bug!
Duplicates: It can happen that another Bird found the same Bug as you did, but a bit earlier. Unfortunately, we can't accept the same Bug twice, so you should look at the list of Bugs that were already submitted. To find the submitted Bugs list, go to the Test Overview page and find the section titled “Your Reports and Bugs”. There, you’ll find the “Bugs submitted by other testers” tab.
Keywords: multiple Bugs, similar Bugs, proof, documentation
It’s important to distinguish between saving and submitting. When you click Save, the current state of your report/Bug is saved. But only if you click Submit will the content be sent to the Birdmaster for review.
Before you submit your report/Bug, you should be able to answer the following questions with “Yes”:
- Did I use correct spelling and grammar? Am I sure that my report/Bug can be understood by someone else, like a Birdmaster or a client?
- Is my report/Bug form complete (i.e. all the fields are filled out, my steps are listed in numbers/bullets, etc.)?
- Did I upload the necessary files (i.e. screenshots, screencasts)?
Then, you can click Submit. Once you have submitted your report/Bug, it’s not possible to make changes.
Usually between 1 – 2 working days, since Birdmasters don’t usually work on weekends. If it takes a little longer sometimes, don't worry! Maybe there are just a lot of other submissions that we need to process right now. If you have submitted your report/Bug correctly, then we’ll definitely see it and get back to you just as soon as we can.
After we’ve received your test report (or Bug), it is processed by a Birdmaster, who decides if the status of your submission will be changed to:
Accepted: This means you’ve done a good job. Well done!
Needs Review: Your test report has some flaws and needs to be revised before it can be accepted. You have the opportunity to rework your test report.
Declined: This usually doesn’t happen, unless you submit the report too late or it was repeatedly submitted as incomplete.
You will be notified about every change of your status. If your report/Bug is sent back, the Birdmaster will mention what’s still missing before the report can be accepted. In this case, please revise your report and submit it again (see How do I write a test report?).
Once your work has been accepted, we will present all tester reports to the client. Clients can read your test reports and Bugs, but never have access to your personal details. Please be mindful of your spelling and remember that once you’ve submitted your work, it cannot be edited anymore unless we reopen them for revision.
Types of Test and Testing Documentation
Here are some of the types of test you may be asked to participate in:
Bug Test: In this test type, you will be asked to “hunt” for Bugs (technical errors). You are paid for every Bug you find, and payment varies depending on the severity of the Bug.
Usability Test: The aim of these kind of tests is to evaluate how easy a product is to use. As a tester, you will provide feedback in the form of ratings and texts to help a client improve their product. You receive the fixed payment announced, once your report gets approved. Please note, you cannot submit Bugs in this kind of test.
BugAbility Test: This test type is a combination of a Bug and Usability test. You will be asked to find Bugs and evaluate the usability of the product. You receive a fixed payment for the test report, and extra payment for every Bug found.
In addition to that, there are many more test types which we will explain in the invitation or our Bird School. For example: Test cases, video recordings, comparison studies or localization.
Bug Approval is when we ask you to re-test Bugs that other Birds found, but on your own device. This way, we know if the Bug happens on only specific devices (e.g. happens on iPhones but not on Samsungs) or on all devices. A Bug Approval is not always part of the test. If it is, we will write it in the test description.
It’s important to remember that Bug Approval happens after the Review Phase has ended (see What do the different testing phases mean?). So only after every tester has finished their report and Bugs, and everything has been reviewed by us, can you start the Bug Approval process. In this process, you will see every Bug submitted by other testers and will look for it on your device. Then, you need to answer whether the Bug appears on your device as well or not. You have three choices: Yes, No and Yes, but differently. In any case, you will ALWAYS have to add a screenshot, unless the (lack of a) Bug cannot be shown with an image. You only have to add an explanation text, if the Bug appears in a different way.
If you are invited to a test requiring Bug Approval, you will find more information about the process in the test description.
You can find a quick run-through in this video (5:24), but make sure to fulfil all the guidelines outlined below.
Definition
Unmoderated Usability Tests are a type of test also sometimes referred to as “Thinking Out Loud” videos. These feature a screencapture accompanied by your comments on all the steps and thoughts you have while you are testing. It is usually not necessary to show your face on webcam. In contrast to screencasts documenting Bugs, the Unmoderated Usability Test is not about the presentation of single situations, instead it is a non-stop recording that portrays your complete testing procedure and all impressions you have.
The purpose of the video is to allow clients to see how their end users use and react to their website or app in a direct and unfiltered manner.
Here is an example of how a Unmoderated Usability Test video could look: https://s3.amazonaws.com/media.nngroup.com/media/editor/2014/08/18/thinking-aloud-demo.mp4
Preparation
- Choose a software to record the video.
- You can find a selection of appropriate software tools within the FAQ list.
- Images and sound must be perfectly clear – no matter which tool you choose to record with.
- The video has to be uploaded in a format that is supported by our platform: 3gpp, mp4, mov, webm, quicktime, x-flv, x-troff-msvideo, msvideo, x-msvideo, avi. If you want to use a different format you have to find a conversion program.
- Please pay attention to software limitations. For example, recordings with Screencast-o-matic are limited to 15 minutes, other software sometimes crashes if videos exceed 25 minutes. Depending on the test you may upload several 15 minute videos instead of one very long one.
- Does the microphone work? Does the recording of your screen work? Try it out with a short video about something else before doing the actual test.
- Create a proper working environment: For example, be careful that the audio recording is not disturbed by background noise (TV, traffic).
- Go through the tasks step by step. Please do not open the software you are testing until you have started the recording to make sure that your very first impression is being recorded.
- Prepare all the required material like task descriptions and useful questions before starting the recording.
*These are general guidelines. However, individual tests can be exceptions and instructions by the Birdmasters overrule these guidelines in specific cases.
Recording
- In order for us and the client to be able to use the video, it should comply with our quality standards. Non-compliance can result in your disqualification from the test.
- Please speak loudly, clearly and formulate every single problem, difficulty and uncertainty to help others understand your statements.
- Crowdtesting is not only about the negative aspects or difficult to complete tasks. Please also talk about everything that appears very comfortable and is simple to handle.
- If you reach a point where you do not know what to do or how to proceed, don’t worry! You should also mention this in your video.
- The video should show your clicks. In the FAQ entry regarding tools, you can find out how that works. If you are not able to visualize your clicks, you must describe exactly what you are clicking, tapping or doing otherwise in the test.
- Throughout the entire testing process, keep an eye on whether the recording still works. Try to check it every few minutes, so none of your work is lost.
- Perform the required tasks and answer the given questions.
- Did you only have the task of describing your impressions of the app or website? Are you struggling with answering the questions? Here are a few additional questions you can answer in your video:
- What are your expectations before clicking on a given element?
- Have your expectations been fulfilled?
- Which tasks can be carried out easily and what is complicated to do?
- What are the aspects you like or do not like?
- Where do you encounter problems?
- Did you understand everything correctly?
- Is some information open to multiple interpretations?
- What features are you missing?
- What confuses you?
- Is there an obstacle you can’t overcome?
- What kinds of feelings does the app/website trigger?
Wrapping Up
- Save the video to your device and keep it for a few days after the test has finished to have a backup if needed.
- Please be aware of the maximum file size you can upload for each test.
- You should try to create a second version of your video if the file size of the original one is too big. Please do not delete the original recording!
- A useful software to compress videos is Microsoft Clipchamp. Simply drag in the video and then click on the “Export” button and select the desired video quality (e.g. 720p), so the video is compressed but retains its quality.
- Please upload the video to the given section and check if your test is complete. After that, hand it in.
Definition
As the name suggests, Remote Interviews are a type of test, where you will be interviewed by someone who is not in the same room. So, instead of having to write a report or documenting your testing in screenshots and screencasts, you will have a conversation through Skype or similar Voice-over-IP (VoIP) applications. As facial expressions often help understanding each other, these interviews can sometimes also take the form of video calls. Sometimes, interviews will be recorded by the interviewer for later reference, so that they can focus on talking to you without having to worry about writing down everything at the same time.
The interviews will either be moderated by a Birdmaster from Testbirds or by the client. In both cases, a Birdmaster from Testbirds will usually join the call and help in case of questions or issues.
The advantage of this kind of testing is that it allows a more natural conversation: Both you and the interviewer can immediately address anything that’s unclear. It’s an informal conversation where there are no wrong answers. At the same time you don’t have to go anywhere to meet up with them, but can still test from the comfort of your home. Testbirds wants to protect your privacy as much as possible during the interview, so we’ll only share your personal information with the client if absolutely necessary and after getting your permission. Please also take care not to mention any unwanted personal details during your video, as it may not be possible to edit them out.
So, as you see, while Remote Interviews might seem unusual at first, they are actually easier and faster than most other tests because you don’t have to write a report. At the same time, the average hourly payout is usually a lot higher.
Preparation
- To participate in Remote Interviews you will usually need the following technical setup on your computer:
- microphone, ideally a headset. It’s absolutely necessary that we can hear each other perfectly.
- webcam (if one is necessary, this will be specified in the instructions)
- stable Internet connection and a decent bandwidth (we recommend 1Mbit/s for upload and 10Mbit/s for download), as the combination of audio, video and your shared screen can create quite a load
- the free software through which the interview is done, e.g. Skype. We’ll let you know beforehand which one it is and where to get it
- If you are using the Voice-over-IP application for the first time, let us know, so we can provide additional help or even do a quick test run with you, if necessary
- Avoid any disruptions and create a proper working environment: For example, be careful that the audio recording is not disturbed by background noise (TV, traffic).
- If the interview requires you to share your screen, please make sure to close any unnecessary or distracting programmes in the background
- We’ll make sure to share all relevant information with you beforehand, so you are well prepared
- Be ready at least 5 minutes before the interview. You can usually already dial in, “meet” the Birdmaster and make sure the technical setup is working.
Recording of the interview
It may be necessary to record the interview (your sound, webcam and screen) for later evaluation, because it’s usually too much to write down during the interview. There are sometimes several interviews happening in a single day, so interviewers can use recordings to refresh their memory or compare answers. We respect your privacy: Without your permission, recordings will not be used for any purposes other than those mentioned above.
Testbirds or the client will take care of recording, so you don’t have to bother and can focus on the conversation.
During the Interview
- Please speak loudly, clearly and make sure to help others understand your statements.
- Often there is a slight delay in audio so please take your time whilst speaking by taking a moment between making points. This will allow the interviewer to dig deeper into your answer, if desired.
- There are no wrong replies, just answer all questions truthfully/according to your opinion.
- Don’t be afraid to give constructive criticism of the software that’s being tested. Clients are grateful for all your suggestions, if it helps them improve their product.
*These are general guidelines. However, individual tests can be exceptions and instructions by the Birdmasters overrule these guidelines in specific cases.
A screenshot is an image of the screen on which you are testing. It is used to show information, for example, if you find a display error (a type of bug) on a website which you're testing, you would include a screenshot showing this part of the site.
E.g. Here is a screenshot from a Windows 10 Computer.
A screenshot is not a photograph taken from a different device.
It does not matter to us how you make the screenshot, as long as the relevant part of the screen is visible. This means that usually the entire browser window (including the URL and taskbar) or the entire app should be visible. We recommend that you highlight the interesting area (like a Bug) on the screenshot, e.g. with MS Paint or a different image editing program. Unfortunately, Android, unlike iOS, does not have a common key combination for making screenshots.
How to make screenshots on the following devices:
Desktop
|
Windows |
Use the “Snipping Tool” or press the button "Print [Screen]”-Button and paste it into an image program like Paint |
|
Mac OS |
Key combination: ⌘ (Cmd) + Shift + 4 |
|
Linux |
Key combination: Alt + "Print [Screen]”-Button OR Ctrl + Alt + "Print [Screen]”-Button |
Smartphones
|
iOS |
Press the “Home” and “Power” buttons at the same time |
|
Android 4.0 and above, Option 1* |
Press the “Volume Down” and “Power” buttons at the same time |
|
Android 4.0 and above, Option 2* |
Press the “Home” and “Power” buttons at the same time |
|
Android 2.3 and below |
Press the “Home” and “Power” buttons at the same time |
|
Windows Phone 8 |
Press and hold the "Windows" button, then press the "Power" button |
|
Windows Phone 8.1 |
Press and hold the "Volume up" and "Power" buttons |
|
Windows 10 Mobile |
Press and hold the "Volume up" and "Power" buttons |
*Depending on your phone type, there are two different ways to make screenshots with Android 4.0 and above.
These shortcuts may vary by smartphone model. If these don’t work for you, look up your model online to see if there are other shortcuts. Easy Screenshot is a free app that takes screenshots on your smartphone.
Important: Always try to create a connection in the text to the screenshot you are referring to! And please only upload screenshots in the formats png, gif, jpg or jpeg
The number of screenshots you should submit depends on whether a (regular) test report or a Bug is concerned. For guidelines about Bug Approvals, see the separate entry. You will usually not be able to submit anything if you have not added enough screenshots.
Test report: For the test report, so-called "alibi-screenshots" are required. We need to see that you covered all relevant parts of the test. In these screenshots you can for example show the positive/negative aspects you mentioned in your report. In the test description, we will often tell you the minimum amount of screenshots required for that test.
Bug: Screenshots are vitally important in order for us to understand which steps led to the Bug and reproduce it. When in doubt, it's better to make more screenshots than too few. In case of malfunctions, a screencast can usually show the problem better.
Important:
- Always try to create a connection in the text to the screenshot you are referring to!
- Only upload screenshots in the formats png, gif, jpg or jpeg!
- Please make sure that the screenshot shows the complete window. This also includes the URL of the test website.
Screencasts record all screen activities in a video. Screencasts can be useful to document certain kinds of Bugs. Especially when it comes to malfunctions (like buttons that don't work) doing a screencast very important. In some tests, screencasts are even mandatory (we’ll mention this in the test description). Remember that our Nest supports the following video formats: 3gpp, mp4, mov, webm, quicktime, x-flv, x-troff-msvideo, msvideo, x-msvideo, avi. The format .swf is not allowed. The maximum video file upload size is 500 MB.
Some free screencast programs for PCs:
For Windows and Mac
Screenpal: recordings are limited to 15 minutes with the free version.
Screencastify (Chrome Plugin): limited to 50 videos per month, each with a maximum length of 10 minutes.
Jing: Jing only saves screencasts to .swf format, which isn’t supported by our platform. However, you can use a Free SWF to AVI Converter to convert it to a format we support. You'd also have to sign up for Jing. We recommend only using it, if no other tool works for you.
For Windows only
To record your screen on Windows, you can use the Xbox Game Bar. First open the window you would like to record. Then press the [Windows] + [G] keys simultaneously to start the screen recording tool. Alternatively, you can also find the tool via the search function of the taskbar. You can enter the search term "Xbox Game Bar" and open the application.
For Mac only
The latest versions of MacOS have an in-built screen recording tool! By default press Shift-Command-5 to open. You can record multiple screens, one screen, or only a selection or choose a mic to use.
Alternatively try QuickTime Player.
You can find help on both of these here.
Linux
Depending on your distribution Kazam might work. But there are many other good applications out there.
Screencast programs for smartphones, iPads and other tablets (RECOMMENDED!):
Some devices have integrated functionalities to record a video of your screen and there are many programs available.
If you are using iOS or Android then we recommend using the Testbirds Companion app for an ad-free, data-safe tool.


- Once you have installed the app, open it, and tap “record” from the menu at the bottom:

- Follow the in-app steps to configure your permissions and settings.
- To record, tap the “record” button from the menu at the bottom of your screen
- Then tap “Start recording now” in the middle of the page to begin.
You will receive a countdown before recording starts.
You can pause or stop the recording at any time. Remember to name and save your video once you’re done. You can also take screenshots using the app.
If you don't want to use the Tesbirds app or you need to record your tablet screen:
Try searching online for "screencast" + your device model.
Otherwise, you can use one of the programs here. None of them require you to root/jailbreak your phone. Some of these may require a PC to which you'll mirror your mobile display and then use one of the PC screen recorders mentioned above.
Android
AZ Screen Recorder (Android version 5.0 and above).
Vysor (4.1 and above; mirrors device to your computer and records sound using PC microphone)
Mobizen (for versions 4.2 and above)
iOS
Caution: This method does not record sound reliably. Starting with iOS 11, your device has an intergrated recording function. You just need to add the feature's button to the Quick Menu/Control Center. To do so, go to Settings > Control Center > Customize Controls. Next, tap the green + button next to Screen Recording. Now, a recording button as part of your general quick control center options.
For other iOS versions:
use QuickTime Player on your computer and connect with the mobile device (see. "Record a movie")
AirServer (free trial version)
Windows Phone
Only if your device doesn't support screencast software at all, should you use an external camera to record a video of the screen.
Crash logs record whenever a program crashes. They help developers to diagnose and repair Bugs,. There are different ways to get such a crash report depending on your device.
iOS: iPhones and iPads save crash logs automatically. These can be found after synchronization under the following paths on your PC:
Operating System Path
Mac OS X ~/Library/Logs/CrashReporter/MobileDevice/
Windows XP C:\Documents and Settings\\Application Data\Apple Computer\Logs\CrashReporter\MobileDevice\
Windows Vista or 7 C:\Users\\AppData\Roaming\Apple Computer\Logs\CrashReporter\MobileDevice\
The folders are often hidden, so it's best to copy the file path and replace USERNAME as well as DEVICE_NAME with the names you use.
Android – There are a few apps that allow you to record crash logs. Many of them however require you to "root" your phone. Please do so at your own risk. Also make sure the app is compatible with your Android version. Here are some options:
Logcat [NO ROOT] - this option does not require you to Root your phone:
- Instructions for use are included in the app description in the playstore.
We are currently not aware of any other ways to record crash logs on Android.
Windows 8 & 10 - The crash logs are saved automatically.
- Use the search to find the “Event Viewer” and open it
- On the left, go to “Custom Views” and open the “Administrative Events”
- Use the time stamp and filters to find the crash
- Events can be saved by right-clicking them.
For additional instructions with screenshots, visit this site.
Testing Best Practice
Bugs are errors in the software, i.e. programming faults. If something is not working the way it should, testers speak of Bugs. These problems have their root in technical implementation. If a function is not working or is displayed incorrectly, even though it was implemented, there is a Bug.
On the other hand, it is a usability problem, if useful functions are in an unexpected place or missing completely. Using the software becomes difficult or even impossible. In any case, usability problems make using the program tedious and uncomfortable. They should be mentioned in your test report as "Negative Feedback", not as Bugs. So if there are functions that you find important, but which aren’t included in the software, it’s not a Bug but a usability problem.
Example 1: The text is too small
It’s a Bug if: There’s an option in the menu of the app to change the text size. After pressing the button nothing happens.
It’s a Usability problem if: The text size of the app is very small, but there is no option in the app to change it.
Example 2: You can’t put an appointment in the calendar
It’s a Bug if: The appointment you entered isn’t saved.
It’s a Usability problem if: The text field to enter the appointment is too small.
Even though the terms are often used similarly, use cases and test cases are very different (see table below). Both terms refer to forms of “tasks” that you have to do during testing. We use them to make sure you cover everything the client wants to have tested.
| Use Cases | Test Cases |
|---|---|
| “Open” task: Something that a regular user might want to do. | Specific task: one exact action. |
| Made up of several sub-tasks (e.g. clicks, actions) that the users have to find by themselves and do one after the other. They are not spelled out in the use case. | There is only one way of doing the test case. |
| Has to be answered in form of a text, listing step by step how you proceeded. |
If the task is successful, you just have to choose “OK”. Otherwise choose “Not OK” and you may be asked to submit a Bug report. |
|
Example Use Case: “Find a pair of brown shoes on the website”. This task could be completed by typing “brown shoes” in the search OR clicking the category “shoes” and looking for brown ones OR using a filter function (each made up of different sub-tasks). |
Example Test Case: “Click on the ‘Shoes’ button”. There is usually no room for interpretation: one button and one way of clicking (clicks are by default left-clicks). |
About Use Cases
We know, it can sometimes feel a bit boring to write down all the steps you took, especially if they seem obvious. But they are not always that obvious to others; and how you write your answers is exciting to read for Testbirds and its clients! It is interesting to see how you approach the task and sometimes this can already be useful feedback in itself, because the client might think that people use the product differently.
-- List ALL your actions, step-by-step in a bullet point list.
-- Don't include any feedback in your answer to the use case. There are usually other sections of the test report asking about what you liked/disliked.
-- Write down WHERE you clicked - ensure that you include any: tab headers, page names, hyperlink labels, article titles, button names or image/textbox labels etc.
-- Describe your actions: e.g. clicked on, scrolled to, hovered over, selected, tapped, opened, typed etc.
Example Use Case (“Task”): Find out what is on the menu at a Ben and Jerry's Scoop Shop.
(A good answer would be something like:)
1. I hovered over Scoop Shops on the top navigation bar. A sub-menu opened.
2. Clicked on Your Local Scoop Shop
3. Scrolled down to where it says Scoop Shop Menu and found 3 menus listed there: Sundaes, Shakes, and Flavours
4. Clicked on "Flavours" to see what ice cream flavours they sell at their shops
5. Selected Peanut Butter Cup and read the ingredients and nutrition facts
Here's an example of a test report by one of our Birds of the Month. The report is about the test of an airline website. For a real test this complex you would get about 15 Euros.
Use Case 1: You want to book a vacation. Find a flight departing from London to a destination of your choice. List your steps.
- I want to visit my grandma in the United States, in Denver. I will now try to find a flight on the website, departing from London. I will bring my 3 children with me of which one is still an infant.
- I'm adding all the options mentioned above via the dropdowns "From", "To", "Travellers". I also include the departure and return dates and the flight class.
- I'm ready and click the "search" button ( See screenshot 1)
- Searching for flights takes some time and there is a "Searching..." Animation, indicating that the site is busy (searching took around 9 seconds).
- Searching is finished. I can now see exactly when an airplane arrives and leaves from my destination, including the costs and remaining seats on each flight. (screenshot 3)
Rating Question: It was easy to search for a flight.
Strongly Agree
Use Case 2: Now, you want to research some destinations. Navigate back to the main page and find the “Destinations” tab (in mobile: use hamburger menu). Select a destination that interests you from the list. Show your choice by uploading one screenshot.
Use Case 3: Finally, you want to find out what films are played on flights of this airline. Did you find the list of in-flight films? List your steps.
- I click on the company logo to return to the main page.
- Of all the menu options, "Information" is the one that sounds most suitable. I click it and it loads immediately.
- The section "Service on board" seemed to fit best. However, the fork and the knife image on the other hand did make me think it was not the section I needed. But I clicked 'Entertainment' as a subcategory under service on board nevertheless (see screenshot 2).
- It turns out I made the right choice: On the following page all the information I could possibly need was displayed. Every single film is listed there and I was even able to select certain genres.
Use Case 4: Explore any other section of the website that interests you (e.g. Holidays, Stopover, Frequent Flyer, etc). What section did you explore? List your steps.
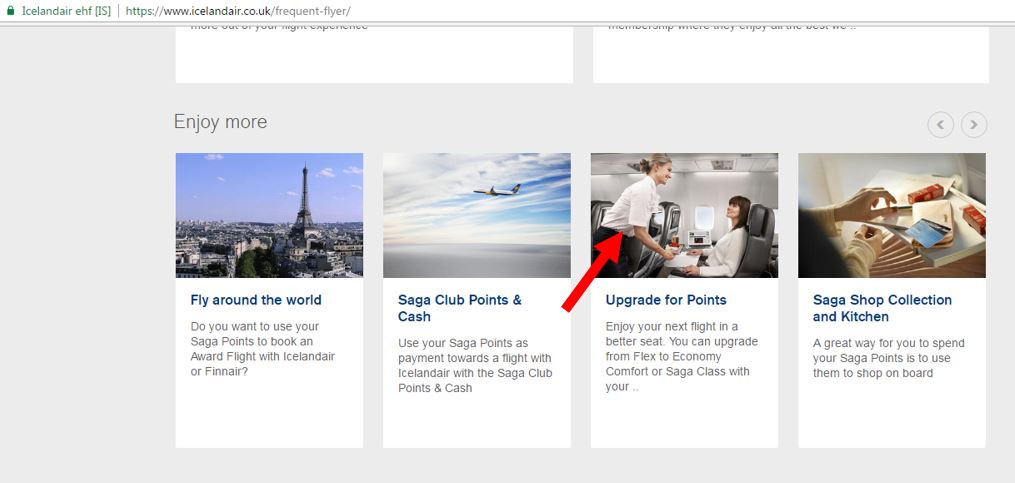
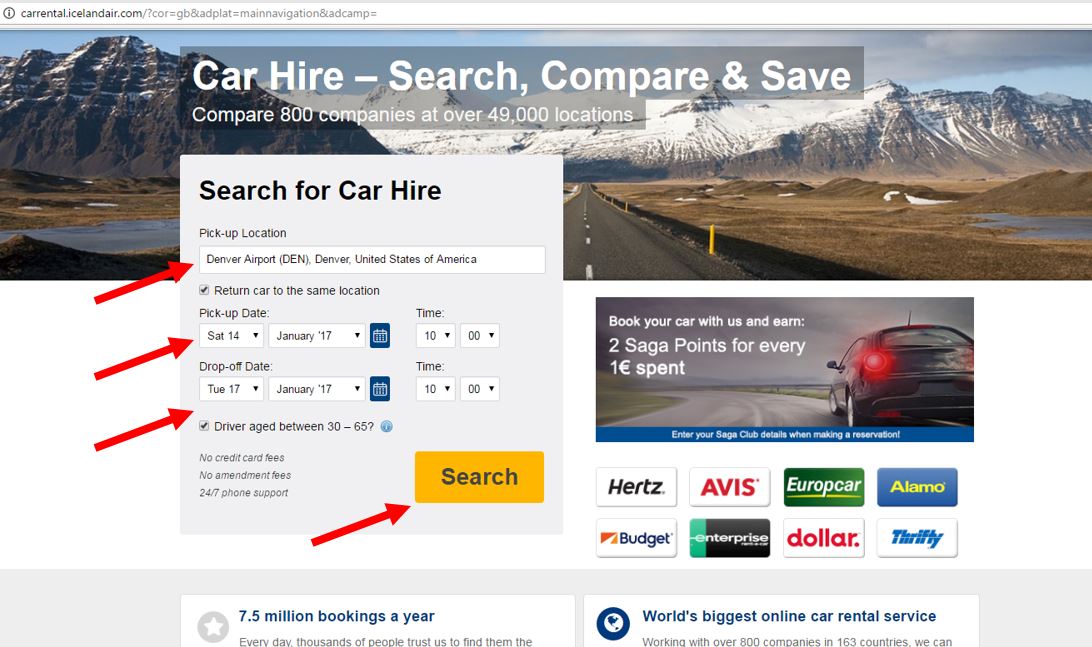
- My grandmother lives far away from the airport and is too old to pick us up. I have my three children with me and I have no idea how to get to my grandmother as all the public transport facilities are far away from her as well. So I want to rent a car. Naturally, I clicked the "Cars" button from the main menu.
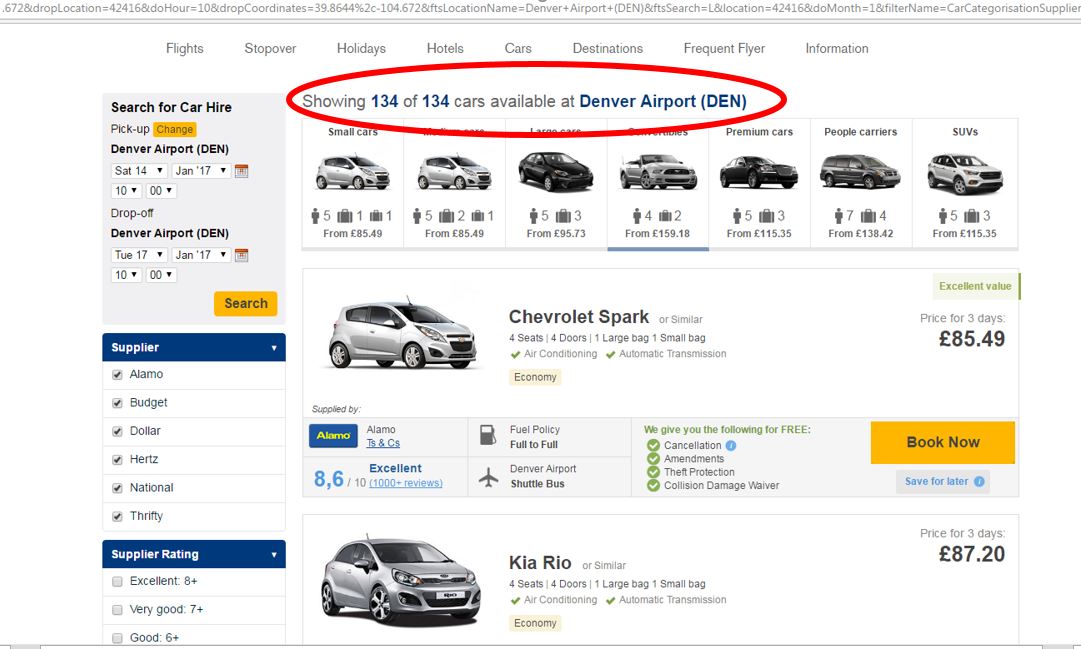
- That leads me to a similar "Booking" module as when searching for a flight earlier (see screenshot 5). I entered the relevant information and clicked search.
- The results show me diffferent cars to choose from (see screenshot 6)
- I then clicked on the menu option "Frequent Flyer".
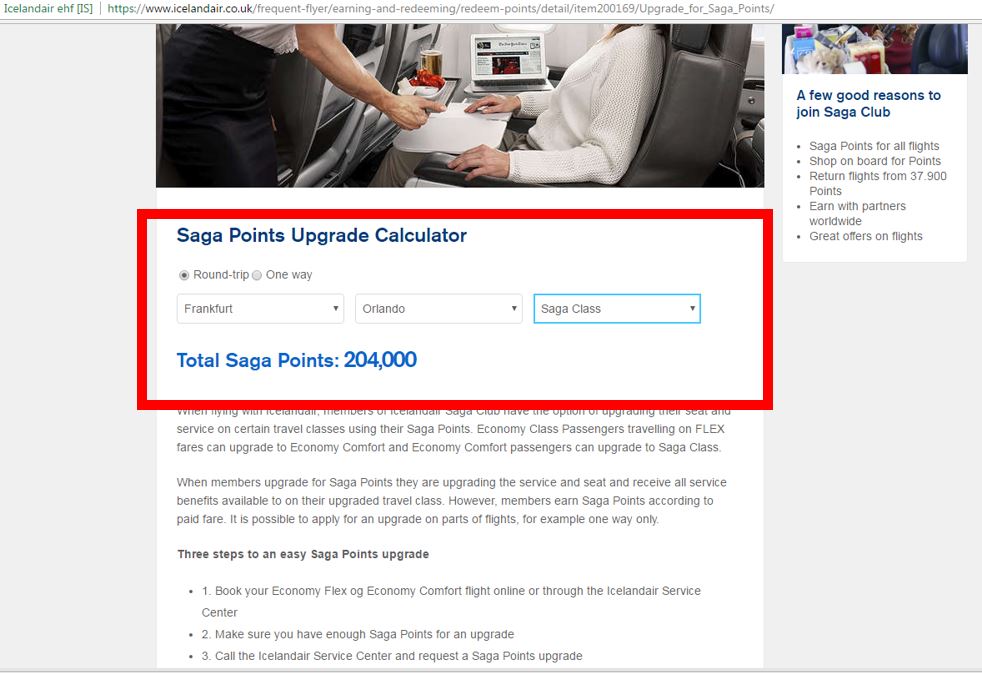
- On the next page I clicked on the image "Upgrade for Points", which took me to a calculator (see screenshot 3).
- I calculated how many points I would need for a first class trip from Frankfurt to Orlando: 204,000 (see screenshot 4).
Open Question 1: Which features/elements of the website did you like? Why (consider details and examples)?
- What I liked the most was the amount of information I got while booking flights, looking for destinations and booking a car, and the way it was presented. Extremely clear and well ordered information.
- The loading times were usually short (~1 second), see exception in next question.
- The website looks really professional. It represented itself orderly through a structure of tables and tiles. The animations, e.g. for loading are colourful and clear.
Open Question 2: What did you dislike about the website?
- I did not like the loading speed when looking for a destination. It was 40 seconds and that's too long. What made it worse was that there was no animation in this case showing that the search was still ongoing. I tried it two more times and had the same experience again.
- It wasn't clear how to return to the homepage. You have to click the logo but that wasn't obvious from the beginning. I accidentally clicked it, and that's how I got to know it could redirect you to the homepage.
- I didn't like that there was a pop up asking me to subscribe to the newsletter. It appeared suddenly (I think it was time triggered) and it bothered me that I had to look for the small "x" to close it. This seems redundant, since the option to "get the latest offers" is part of the footer of most of the pages on the website anyway.
Open Question 3: If you were responsible for the website, would you change something? If yes, what would you change and why would you change it?
I would definitely try to improve the loading speed for slower sections, as I personally think that is the largest pitfall of the website. People might actually cancel looking for a destination due to the long loading time.
Screenshots:
Your feedback is the most important part of your test report. Our clients pay you, because they want to know how you feel about their product and why.
Depending on the questions we ask you in the test report, you can give feedback about navigation, design, amount of information, overall impression or other aspects of the product tested.
Questions could be for example:
- What do you like about the application? Why do you like these aspects?
- What do you like or dislike about the sign-up process in this app? Where did you have problems?
- If you were in charge of building this website, what would you do differently?
- How would you describe your experience of watching videos on this site, and why? Please also comment on the content quality of the videos.
Common Mistake no. 1 when writing feedback
Not enough explanation for feedback e.g. "I liked the website, it was user-friendly and looks good." You need to give a specific reason to explain WHY you think the site is "user-friendly" and/or provide an example of a feature/element which supports this point.
"The website is easy to navigate - the navigation header is divided into clear categories, ensuring it doesn't take too many clicks to reach the information you're looking for. The tab names were easy to understand, e.g. "Flavours", so the user could easily reach the desired information..."
Common Mistake no. 2
Focusing only on your personal opinion (when it’s not part of the question) e.g. "I disliked the use of red, because I do not personally like the colour red."
This kind of feedback is often not constructive because if the developer were to change the colour of the site to, say, blue, other users could equally complain because they don’t like blue. There'd be no end! If red also is part of the company’s corporate design, it’s unlikely they will change it soon. On the other hand, if the majority of testers doesn’t like red, there might be a point in mentioning it, so the designer can reduce the amount of red. So we recommend giving feedback based on objective facts and only adding personal opinions rarely and on top.
"It was a strain to read any text on the landing page, due to the red background. There is not enough contrast between the font colour (bright red) and background colour (dark red), so information is missed. Further to this, the lack of distinction between the colour of hyperlinks and normal text made it hard to notice links. I personally don’t like the colour of the large blue header."
Here are two examples of good bug reports from our Entry Tests. The layout is different in the actual Bug form, but the fields should be named similarly. If you want to know how to report a bug, please look at this FAQ entry: How do I report a Bug?
Example 1
Bug Title: Find Location - Lower case "g" is cut-off in the shop locator search bar
Bug Category: Display Error
Severity: Low
Occurrence: Always
Steps that led to the Bug:
- Clicked on the shop locator icon in the top right corner
- Searched for the following post-code: 021316
- Pressed Enter
Expected Result:
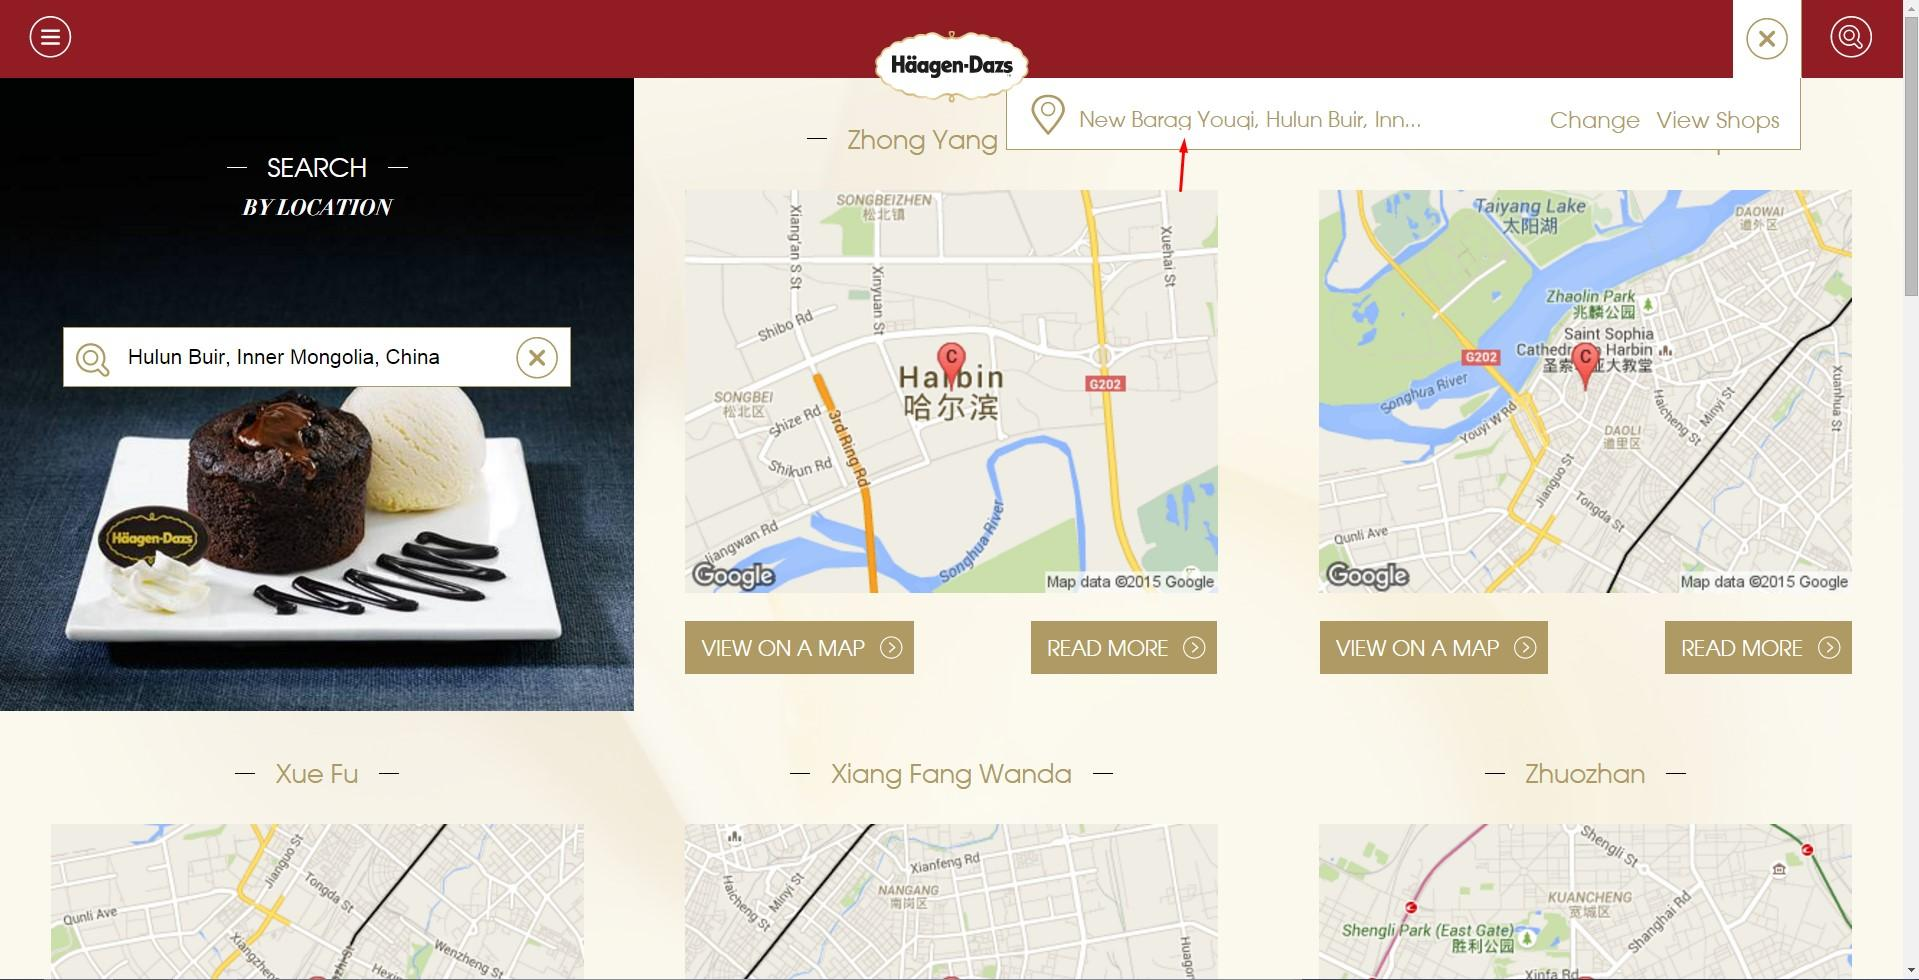
The result shows New Barag Youki, Hulun Buir... without any UI issues
Actual Result:
The location names that contain a lower case "g" are cut-off. The same applies for "q".
Screenshot:
Example 2
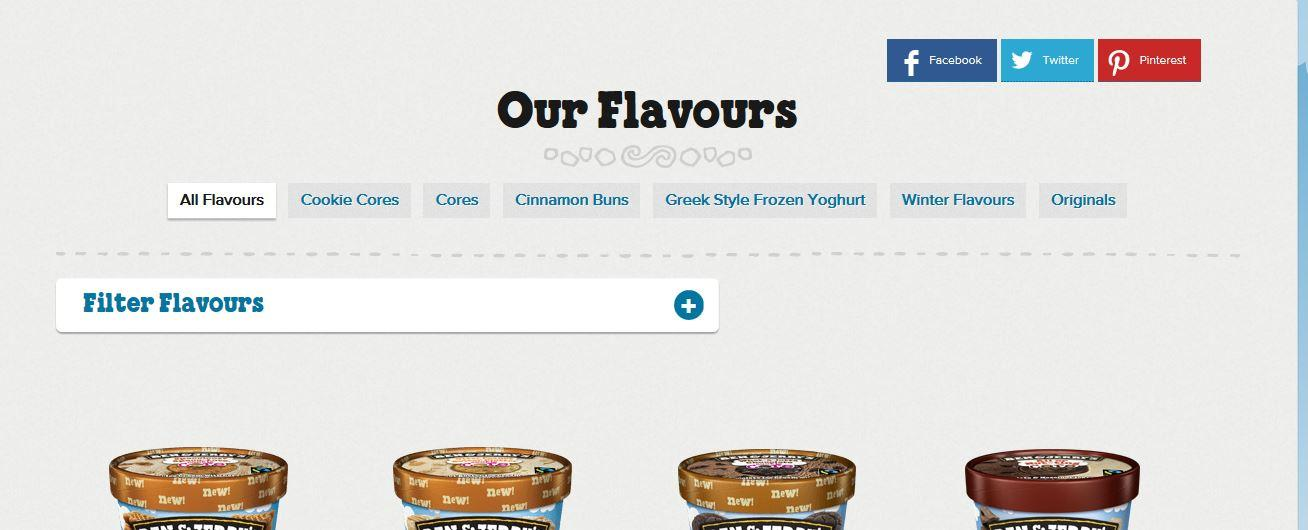
Bug Title: Flavours Page - Cinnamon Buns tab not showing the results
Bug Category: Malfunction
Severity: Medium
Occurrence: Always
Steps that led to the Bug:
- Go to Flavours Tab
- Click on "Our Flavours" from the dropdown list
- Click on the "Cinnamon Buns" tab under the page title
Expected Result:
Information about Cinnamon Buns Ice Cream displayed.
Actual Result:
Getting redirected to the main landing page.
| Screenshot | Screencast (Press to play) |
 |
 |
Here are some of our "top tips" for inducing Bugs. Please use common sense when submitting Bugs, e.g. a website will of course not work while you are offline.
In general
- Try to cover all different kinds of functions the software has to offer (unless they are mentioned as “out of scope”).
- Scan every page from top to bottom to make sure you don’t miss out on anything.
- Look for “special” content types like videos, slide shows, streams, maps. These tend to be especially prone to Bugs.
- Save progress, close software/log out. Was everything saved correctly?
- Use multiple filters and observe whether the results make sense.
- Take different paths, don't only navigate one way, i.e. pretend you changed your mind, go back, try something different than before.
- Try anything that a user might do.
In apps
- Change from portrait to landscape mode
- Minimize app and use a different application (e.g. music player, browser)
- Turn Wi-Fi and data connection on/off
- Activate Airplane Mode, GPS and Bluetooth
- Receive a call and text message while using the app
- Play music (downloaded, streamed and via the radio) on the device while testing
- Switch your device off and back on again
- Use Tethering
- Go to an area with bad signal, e.g. the basement
- If GPS is part of the functionalities, change your location
That depends on the test. If “spelling error" is available as a category in the “Add Bug” form, then you can report spelling errors like any other Bug. Sometimes, the client doesn't want these to be reported as Bugs. In this case, your Birdmaster will let you know in the Test Description, but you can always mention spelling errors in the dislikes/negative feedback section of your test report.
If there are several errors in a single text, please submit one Bug for the entire text on that page -- not a new Bug for every error.
Payments and Legal Stuff
Your employment type as a tester with Testbirds is self-employed, meaning on a freelance basis. When testing with us, you don’t need to sign a work contract and you are not an employee.
Whistleblowing allows testers to report any unethical behavior or violations of Testbirds' compliance guidelines. This helps ensure we maintain high ethical standards and a fair testing environment.
1. Who can report issues?
All Testbirds testers are encouraged to report any behavior that does not align with our ethical standards or topics like: discrimination, bribery, criminal behaviour, unsafe environments, trade secrets.
2. How can I report misconduct or unethical behavior as a tester?
You can report any issues in the following ways, depending on what you are comfortable with:
- Directly:
- Contact your primary point of contact at Testbirds (such as your Test Manager).
- Email HR at: hrm@testbirds.com
- Contact the VP of HR, Kathrin Doering, directly via email (k.doering@testbirds.com) or phone (+49 15773322511).
- Anonymously:
- Send an anonymous email to: compliance@testbirds.com (using an anonymous email account).
- Send a letter to:
Kathrin Doering (confidential),
Testbirds GmbH, Radlkoferstraße 2, 81373 Munich.
3. Will my report remain confidential?
Yes, any data you provide will be treated confidentially in accordance with GDPR guidelines.
4. How soon will I get a response after submitting a report?
You will receive a confirmation within 7 days of submitting your report.
Generally, your income will be taxed according to your country’s tax regulations. Please consider declaring your Testbirds income to your local tax authorities. According to our terms and conditions, testers are responsible for paying any taxes due on the income generated through Testbirds.
Unfortunately, we as a company are not allowed to give you any tax advice based on your personal situation. We kindly ask you to consult a professional tax consultant for advice. Thanks for your understanding.
You can find background information on the topic of employment in the following FAQ entries:
Am I employed by Testbirds?
Do I have to inform my employer about working with Testbirds?
Do I need to pay tax on the money I earn at Testbirds?
What do I need to consider?
To counteract tax avoidance, platforms such as Testbirds must forward tester information to the tax authorities. This is based on EU Directive 2021/514 (DAC7). Further information on this: PStTG for Germany and DPMG for Austria.
When does Testbirds start transmitting the data?
Retroactively for the year 2023, the first transmission of data will take place in April 2024.
What specific information does Testbirds transmit?
- Full name
- Address
- Date of birth
- If name is different: Enter the name of the account holder
- Quarterly fees, commissions and taxes received
- Quarterly total income and number of services provided
- Tax identification number (TIN) and the issuing country
- if available: VAT identification number
What is the TIN?
The TIN (Tax Identification Number) is a unique number issued by the tax authorities to identify taxpayers. You can find your TIN on official tax documents such as your income tax return/pay slip. If you cannot find your TIN, you can request it from your local tax office.
Important: Do not confuse the TIN with the tax number or your VAT identification number. The German TIN has 11 digits, the Austrian TIN normally has 9 digits. Other EU countries have different formats. Avoid using old eTINs.
Why is the TIN important for testing?
In a nutshell: We cannot pay out the money you have earned without your TIN.
If you have any questions or need support, please do not hesitate to contact us.
Keywords: data protection guidelines, tax reporting obligation, platform user, freelancer’
Possibly. Please check your employment contract, for specifics regarding how and when you should inform your employer about your freelance occupation at Testbirds. Your contract might outline which amounts of income and weekly hours need to be declared and which do not.
Yes! We welcome testers of all ages. However, for legal reasons we require that testers under the age of 18 have their parents/guardian complete and sign a consent form and then upload it to our platform in your "Profile" section (PDF format only). You can download the form here. If you encounter any issues, feel free to contact us.
Keywords: minors, underage
Payment for different test types
Usability Tests: You will receive a fixed payment for these kinds of tests. A payout can be requested after your report has been “approved” by our Birdmasters. Depending on the complexity of the test, the payment could be 10 Euros, 50 Euros or more.
Bug Tests: In these tests you will be paid per unique Bug that you find. Payment usually varies between 1 Euro for low severity Bugs and 5 Euros for critical Bugs. So, the more Bugs you find, the more money you can make!
Combinations of Test Report and Bugs: These combine fixed and variable payments and are often called “BugAbility” Tests.
Rule of thumb for your earnings: if you work at a normal speed you are usually going to earn 10 Euros or more per hour.
Depending on the form of payment (see Payment methods: How am I going to receive money?), third parties may deduct fees from your earnings.
Testbirds works with the currency Euro (€), but don’t worry you’ll still be able to use your payment in your local currency. The payment value which is displayed in your local currency in the Nest is based on a recent exchange rate but please keep in mind that it is only an estimate of what you will receive. The real payment amount, however, will depend on the exchange rate on the day of the payment as well as on PayPal or your bank (e.g. if they charge a conversion fee), because we always transfer money in Euros.
If you live in a country that’s part of the Single Euro Payment Area (SEPA) we can pay you directly to your bank account (via IBAN/SWIFT) or PayPal. Countries in the SEPA are mostly in the EU and EEA; you can check if you’re in the SEPA here. Many of our testers are using a service called payoneers Global Payments Service to get an IBAN account outside the SEPA.
If you can't receive money via an IBAN, we will pay you via PayPal. In some countries (e.g. Nigeria, Turkey, Ukraine, Macedonia, Montenegro) PayPal is restricted: you can pay with it, but you can't receive money. In those cases, don't hesitate to contact us once you have earned money testing and want to request a payment to discuss additional options. Please be aware that when you are using PayPal, you have to pay a fee to PayPal as the receiver of the payment. This is deducted directly by PayPal.
Once you have an account balance equivalent to €6, you can request a payout in the Nest. For security reasons, there is a buffer of 48 hours, i.e. only amounts that are approved more than two days ago will be considered for a payout and you can do a new payout only once every 48 hours.
All the necessary information (e.g. payment details, PayPal address, tax number, if necessary) can only be entered when you make a withdrawal. The information given in the payout section will be saved for future payouts, but you can also change it prior to each disbursement.
After requesting a payout, you can download your credit voucher as a PDF document from the "Payments" section. However, for this, your complete contact information, such as name and address, must be made available. Only if this is the case, can your payment be made.
Even though our system will try to adapt the displayed payments to your local currency, you will sometimes see payments specified in euros (€). The amounts in your local currency are only an indicator, using a recent exchange rate. The actual amount you receive corresponds to a fixed amount in Euros: We always send money in Euros and the conversion rate will depend on your bank or the PayPal exchange rate. Some banks may charge a fee for converting Euros. We have no influence on conversion rates.
Payday is in the middle and at the end of each month. Bank transfers can take a few days longer than PayPal. Therefore, it is not uncommon for payments to be processed up to 25 days after the date you requested them.
We don’t want to collect your payment information before there is something to pay you for.
Therefore, you can only enter or change your payment information (e.g. IBAN, PayPal) when you request a new payout. To do so, you need to have reached the payout minimum of 6 Euros (or your currency equivalent).
Whenever you request a payment, make sure that your payment details are still correct. If they aren’t, create a new payout method.
This applies only for residents of SEPA countries*: An IBAN (International Bank Account Number) is your bank account number turned into an internationally recognized format. Your BIC (Bank Identifier Code) is the international version of your sort code. Your IBAN and BIC can be found on paper bank statements or in your online banking platform. There are also a number of trustworthy IBAN converters available online. More information can be found here: https://www.business.hsbc.uk/en-gb/payments/clearing-and-foreign-currency-payments/iban-and-bic
*If your country doesn't have IBAN and BIC, you can sign up on payoneer.com and request a European card. The "Global Payment Service" section will then list your IBAN and BIC.
If you don’t have an IBAN and BIC, you can still get paid through PayPal.
Another option would be to sign up for payoneer’s Global Payment Service. This gives you an IBAN and BIC even if you don’t live within the SEPA.
Some points to keep in mind:
- payoneer has charges, e.g. for withdrawing money at an ATM
- You need to sign up for a Euro account with payoneer, the default is dollars
- To verify your account with payoneer, you need to provide proof of identification (e.g. passport, driver’s license)
- It can take 3-4 weeks until your card is delivered
As a tester with Testbirds, you are working on a freelance basis, meaning you are self-employed and you have to take care of the necessary/recommended insurance yourself. As insurance regulations vary from country to country, we kindly ask you to contact a professional insurance consultant in your country for advice. Thanks for your understanding.
Testbirds Companion App
The Testbirds Companion App is a brand-new resource to support you! Not a Nest replacement, rather Testbirds Companion gives you access to some new features to enhance your experience!
How it helps:
- Don’t worry about missing an email anymore – get push notifications so you can respond quickly to time-sensitive tasks. Just click the link in the App and get redirected to the relevant test page
- Stay on top of which tasks need doing first with separate urgent and other tasks lists
- Keep your device data up-to-date – opt to automatically sync your mobile phone with your account and keep your device information accurate
- Easy access to Bird News so you can see promoted testing opportunities
We also plan to gradually increase the capabilities of the App! Right now, it contains the first set of features to help you with testing for Testbirds. We will continuously implement more and more functionalities to support you during test cycles. In time it will become a Companion for your everyday testing life.
The Testbirds Companion App is currently only available in English and German
The iOS version is avaiable here: https://apps.apple.com/de/app/testbirds-companion/id1512755199
...or via this QR code:

...or via this QR code:

The Testbirds Companion is available on the following devices:
iPhones – iOS versions 13 and over
Android phones – Android 6 and over
The Testbirds Companion App is currently only available in English and German